Are you looking to complete your Google Certified Educator Level 1 exam? We’re here to help! This is the first of a series of posts to help you gain the confidence that you need to ace your Google Certification!
Here, we’re going to go over the 5 key Gmail skills that you need to know. Gmail is quite a powerful tool and has lots of intricacies, so we are stripping it down to the essential skills for the Google Certified Educator Level 1 exam.
If you’re interested in learning more about what Gmail can do, make sure you check out our podcast episode all about Gmail. It’s jam-packed with lots of tips and tricks to help you tame your inbox.
A Quick Overview of the Google Certified Educator Level 1 Exam
The Google Certified Educator level 1 is a certification that you can obtain to show your mastery of using Google tools in your classroom. There is a really great curriculum for you to review on the Google Teacher Center as you are preparing for your exam.
The Google Certified Educator level 1 exam consists of two sections ( a short section of multiple choice, true/false, matching, etc. followed by a much larger scenario-based task section). You have 180 minutes or 3 hours in length to complete your exam. It costs $10 USD to register, which is honestly not that expensive. Keep in mind that you do need to re-certify every 3 years to make sure that you stay current with the Google tools.
Our goal in this series of posts is to break down the skills by each tool to help you become proficient with them all and gain self-confidence in Google Workspace.
The 5 Skills in Gmail You Need To Know
So what are the 5 skills that you’re going to need to master in Gmail? Well, here they are (in no particular order):
- How to use stars to get organized
- Understanding the different inbox types (especially priority inbox)
- Using the search tools in Gmail
- Creating and using labels
- How to create and use filters
So, let’s get started with looking at each skill in a bit more depth!
1. Using Stars in Gmail For Organization
Stars in Gmail are really great – they make it a little bit easier to find those important emails when you use stars strategically in your Gmail inbox. Any email that is marked with a star is automatically added to your Starred folder in Gmail, so you really want to use these sparingly and ONLY for those emails that are truly important!
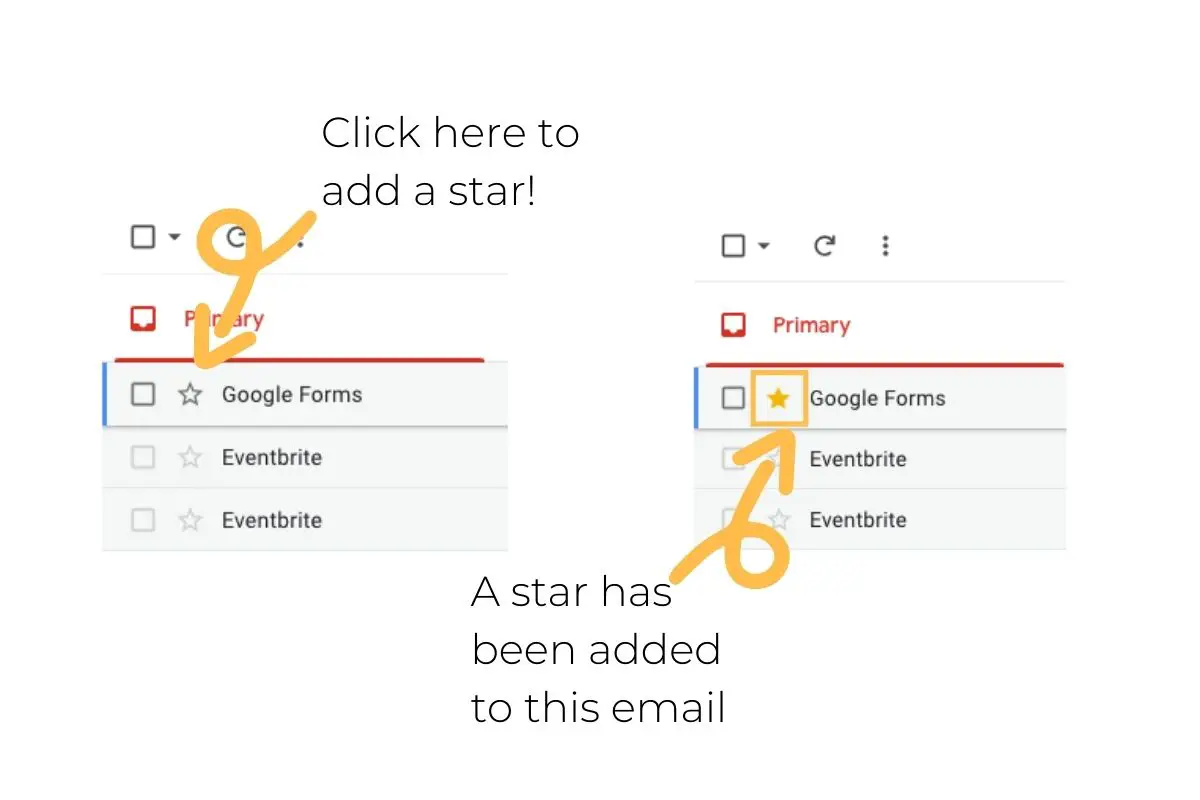
To add a star to an email, simply click on the star that appears to the left of the message in your inbox. If you have multiple stars set up in your account, you can continue to click on the star until you hit the colour/shape that you are looking for.
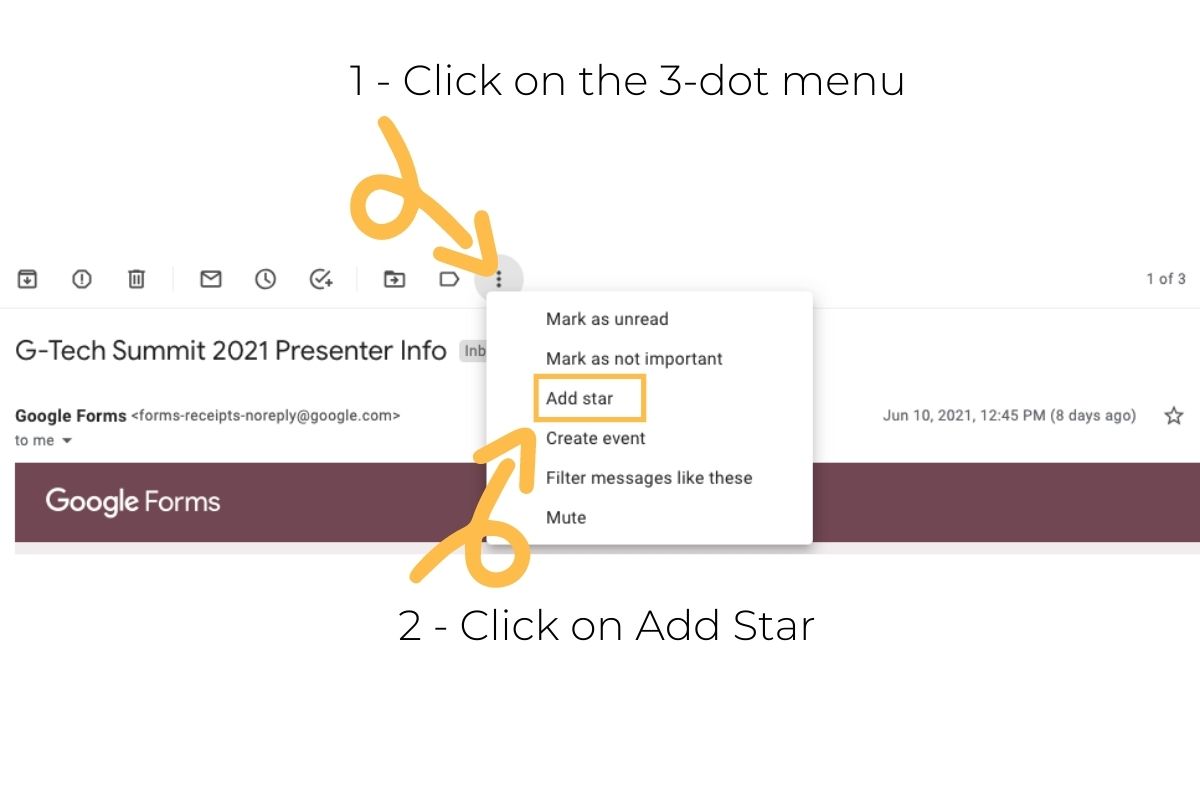
You can also add stars inside of an email, either through the three dot menu at the top of your email or by clicking on the star in the top right side of your screen.
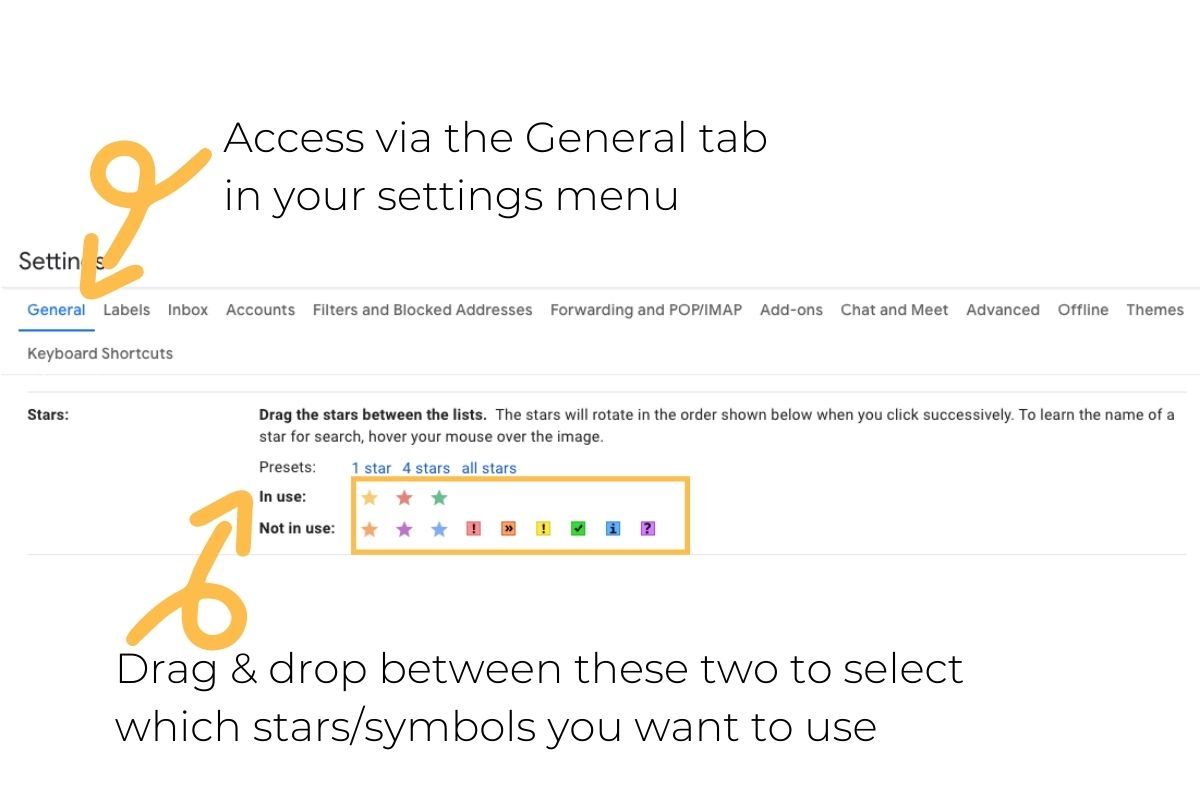
To change what colour stars (or even different symbols) are available to you in your inbox, you need to customize these in your settings panel. Navigate to the settings cog wheel, then See All Settings, and under the General panel (almost at the bottom), you can drag and drop between In Use and Not In Use. Just make sure you scroll to the bottom and save your changes (it’s not automatic).
Our best advice: think of using stars to colour code those important emails or to help you remember to reply to certain emails. Overall, use stars sparingly to truly get the most out of them!
2. The 6 Available Inbox Types in Gmail
Did you know that you can customize the look and feel of your inbox in Gmail? There are 6 different types for you to select from AND there are additional options for customization in some of the types as well. This means that you can really get the look and feel that you want so that it is just right to meet your needs.
To access the different options for you inbox, you’ll need to click on the settings cog wheel. From there, you can access all of the inbox types.
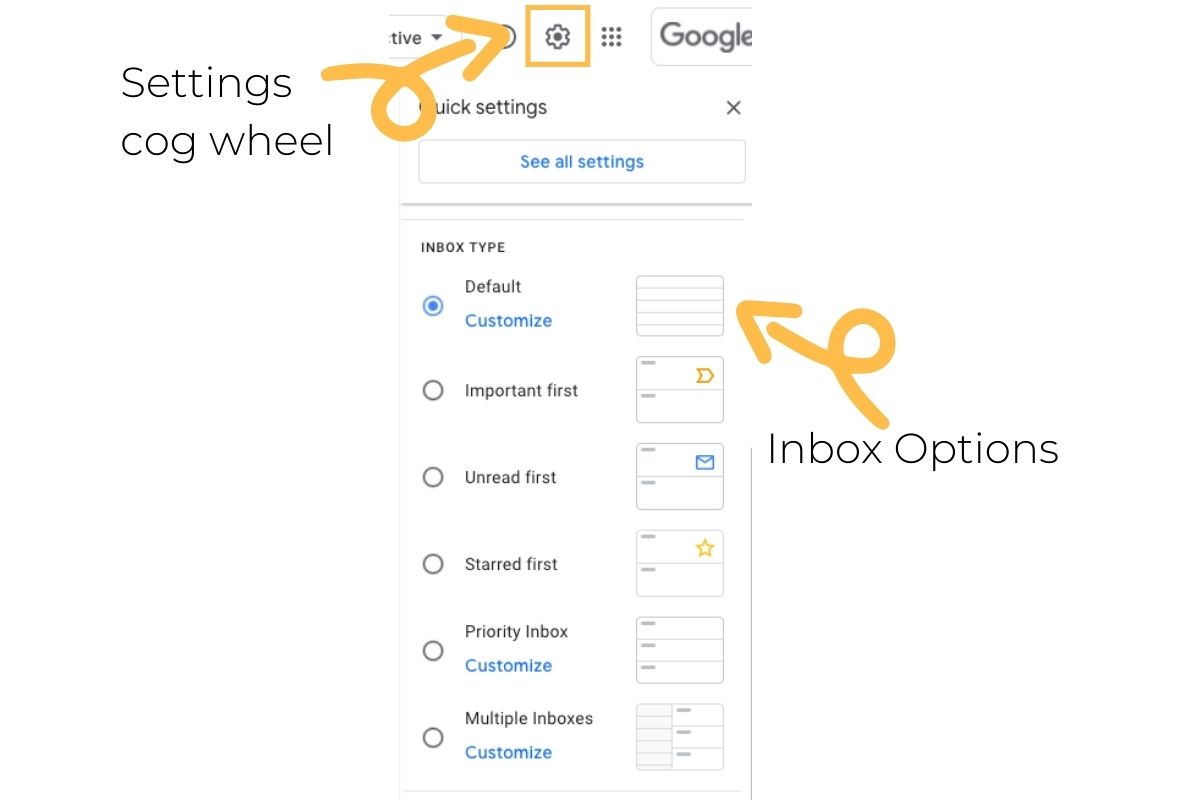
The first type is Default. This is likely what your inbox is set on if you’ve never changed it. Default is the standard view of Gmail and can be customized in terms of what tabs you have available in your inbox. The primary tab is always enabled and then you can choose to add social, promotions, updates and forums tabs.

The next three types of inboxes are pretty similar to one another. They are Important First (any emails with a flag show up at the top), Unread First (all unread emails show up at the top), and Starred First (all starred emails show up at the top).
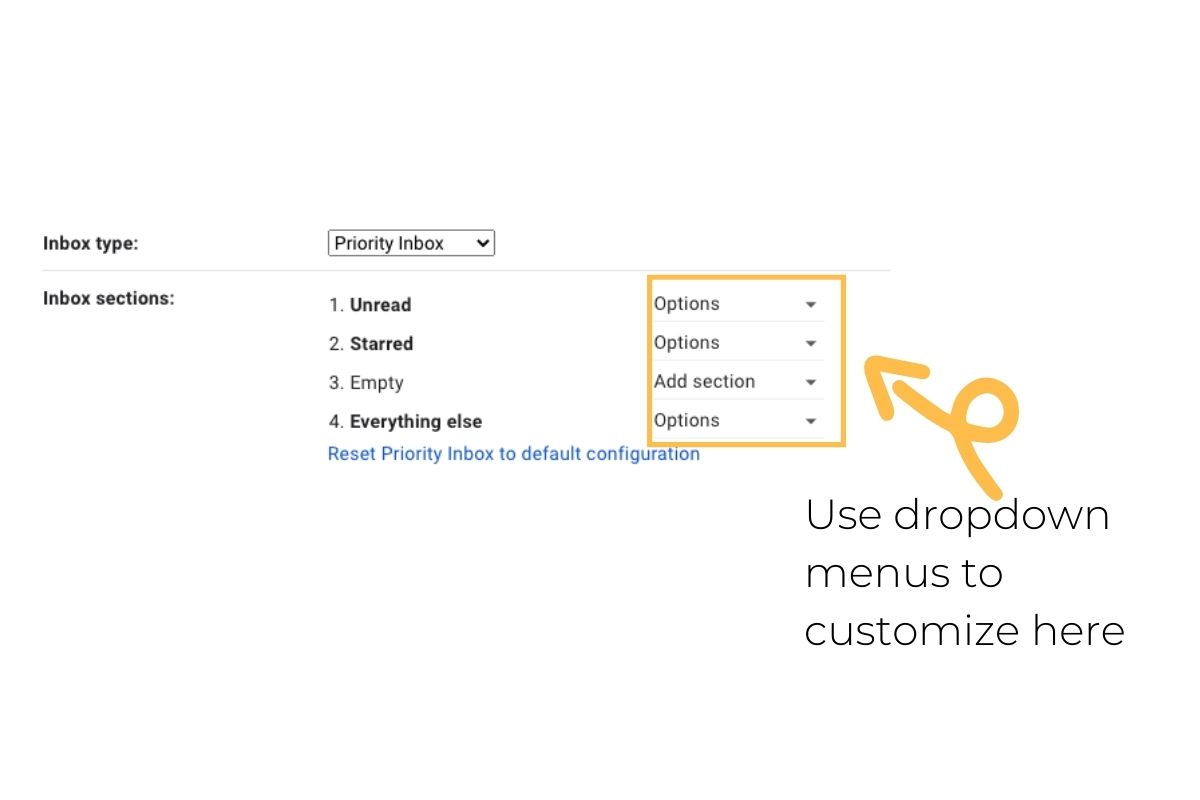
Next is your Priority Inbox. This one is especially important for you to know and explore as it is emphasized in the Google Certified Educator Level 1 course materials. Priority Inbox separates your inbox into multiple sections, which can be customized, and Gmail will learn and begin to categorize your emails based on your frequency of actions taken. How cool is that?
The final type of inbox is Multiple Inboxes. It’s similar to Priority Inbox but gives you a bit more freedom in terms of what you setup in your inbox. Of course, freedom also means a much steeper learning curve in terms of the setup! We’re not going to go into specifics here but if you want to learn more, check out this help article from Google.
3. Using the Search Tool Effectively in Gmail
Learning how to effectively use the search tool in Gmail is not only important for the Google Certified Educator Level 1 exam, but will also save you so much time when you are looking for a specific email.
There are lots of options to narrow down your search using the filters dropdown menu so make sure you explore this tool and try some different things out. You can search by email address, subject, keywords, size, date, attachments, and so much more!
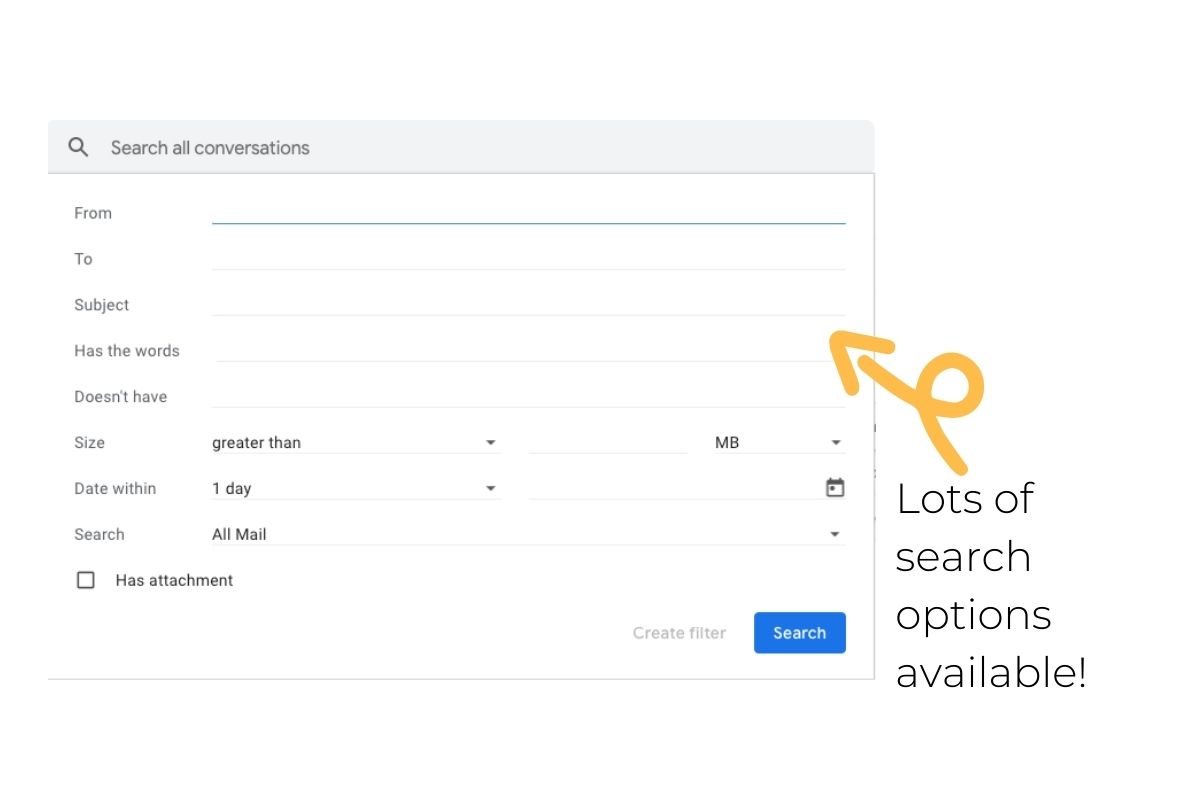
You can also make use of Gmail search operators to really speed up your search process in Gmail.
4. Creating and Using Labels in Gmail
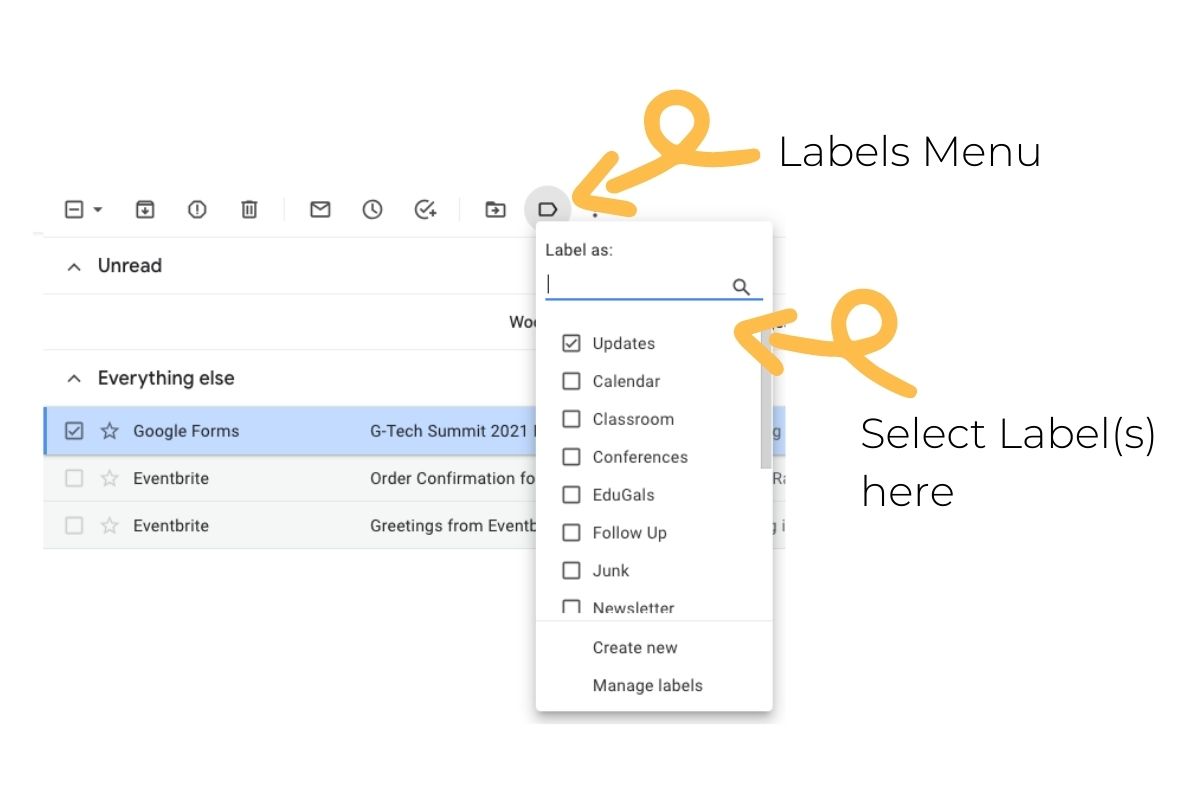
Labels are super useful to get yourself organized in Gmail. They are a bit like folders, except that you can add multiple labels on a single email. This can be really handy when you’re not quite sure where to put an email since it fits in a few different categories. If you have any labels created, they will show up in the left side menu in your email inbox.
To create a label, you can click on the More tab in your left side menu of your inbox, then scroll down until you see the Create New Label option. Click on that, type in the name of your label, and decide whether you want to nest it under another label or not. Then click Create to save your new label.
When you hover over any of your labels in the left side menu, you’ll notice a 3 dot menu option appears. Click on that to change the label colour as well as some other options. Our favourite is to Show If Unread for those labels that are not as important to show up in the main left side menu all the time. You can also edit and/or delete your label in here.
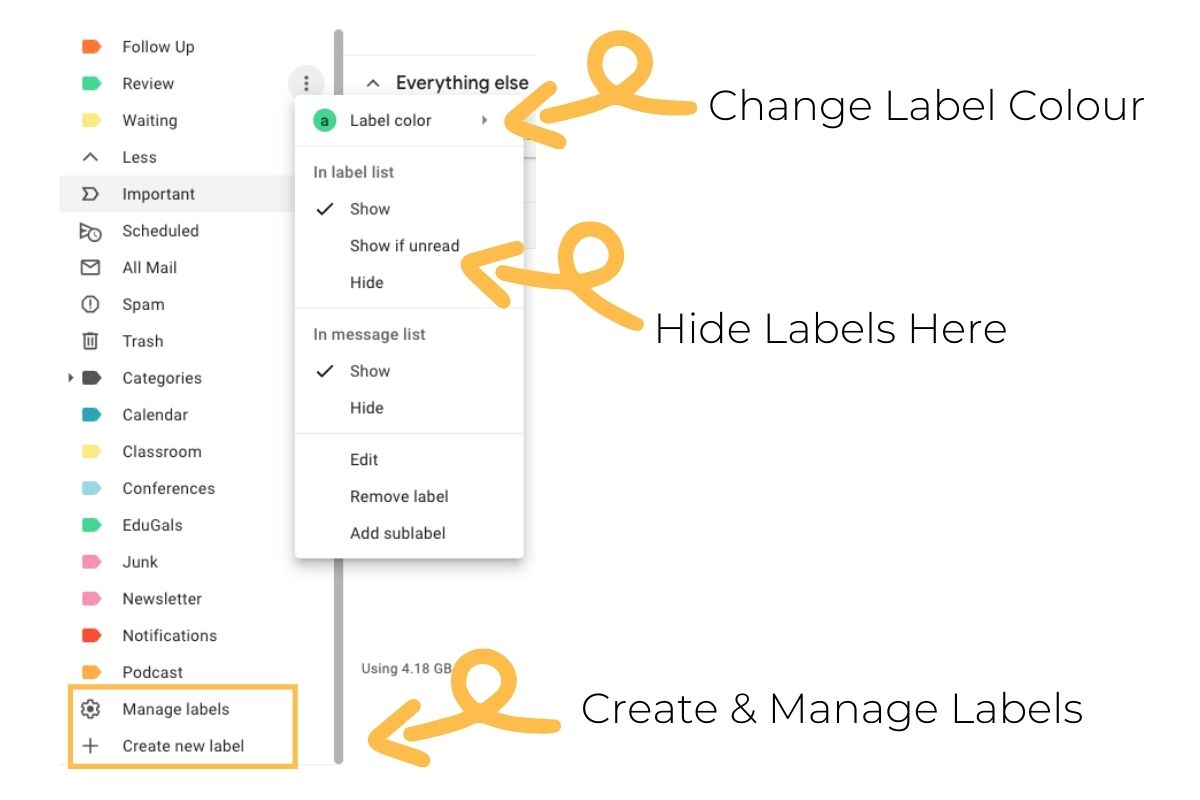
If you need to bulk edit your labels, scroll down to the bottom of the left side menu in your main inbox and select Manage Labels. There are lots of editing options in here so make sure that you explore this option.
To apply a label to an email, click on the checkbox beside the email, click on the labels tag in the top menu, and select the label or labels that you want to apply. You can also access this menu inside an email as well so there are lots of options to apply labels to your message. If you have keyboard shortcuts enabled, you can also access the label menu by simply hitting the l key. We use this shortcut all the time!
Make sure that you archive your emails when you are done with them. They are super easy to access later on from your labels menu in the left side of your inbox or you can search your inbox by label in the search tool along with other filters and keywords.
5. Maximizing Your Productivity With Filters in Gmail
Filters can help you filter and automate some regular tasks in your Gmail account. This can be super time-saving, especially when you combine it with labels and stars. For example, are there labels that you always apply to specific emails? Well, you can set up a filter to do that for you so you don’t have to!
To create a filter, you first need to use the search tool to determine what emails your filter will apply to. Go back to topic #3 (using the search tool effectively in Gmail) if you need a bit of a review. Make sure you do the search first before creating your filter to ensure that Gmail is going to pick the right emails that you are looking for.
Once you’re happy with your search terms, go back into the search toolbar and this time, click on Create Filter. From here there are a TON of different options so play around a bit and decide what works best for you. Our favourites are Skip the Inbox, Mark as Read (for some email filters), Apply The Label, and Also Apply Filter to Matching Conversations.
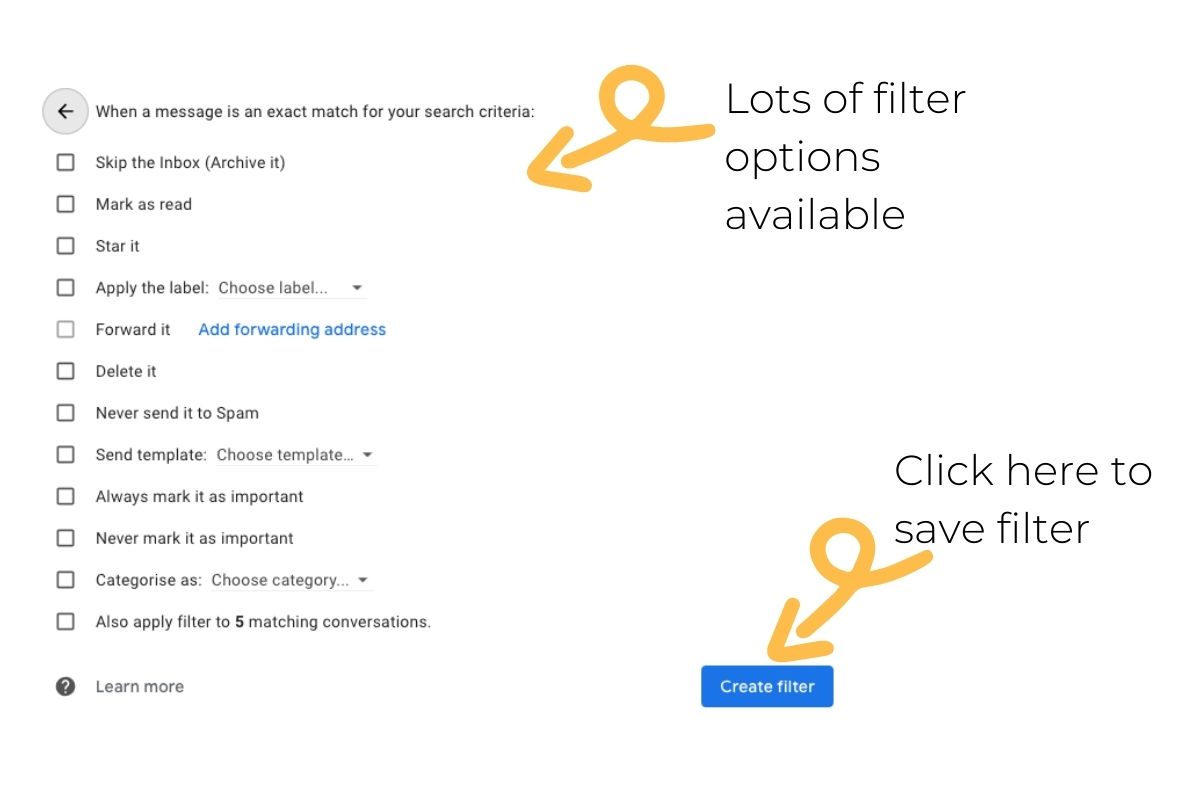
If you need to edit your filters, you can access this via the Settings Menu, then See All Settings and go to the Filters and Blocked Addresses tab. From here you can access all of your filters to edit and/or delete.
Bonus Tip: If you’ve created filters that you love, you can export and import your filters to other Gmail accounts in the Filters and Blocked Addresses tab. Select the filters you want to include by clicking on the checkboxes, then scroll to the bottom to select Export. In your other Gmail account, go to the same menu, but this time you are going to pick Import instead and select the file you created from your export.
Final Thoughts…
Once you’ve mastered these 5 Gmail skills, you will be prepared and ready to tackle your Google Certified Educator Level 1 exam (at least, the Gmail portion!). Stay tuned for the next post in this series as we continue our learning journey through all of the Google tools so you can rock your Google Certified Educator Level 1 exam!