As regular podcasters ourselves, we love podcasts, podcasting, and all things audio. We have learned so much in our podcasting journey together and we see so much value for using student-created podcasts in the classroom!
The challenge with podcasting in the classroom is that it can be very overwhelming with where to actually start. There are so many tools available for recording, editing, publishing and sharing – so where do you start?
In this post, we’ll show you a relatively simple solution for student-created podcasts with Screencastify, an easy-to-use screencasting tool. Students can create podcasts using Screencastify as their ONLY tool, so keep reading to see how you can leverage this in your classroom.
7 Reasons Why You Should Use Student-Created Podcasts in Your Classroom
Before we dive into the specifics of tools and podcasting, it’s worth taking a moment to talk about why podcasting is so great in the classroom. There are many benefits to having your students create podcasts, including:
- It is an easier entry point than creating videos. Students who are more introverted or camera shy will find that talking behind the microphone is a bit easier to start.
- It builds and develops storytelling skills. Students will learn how to create effective storylines that will hook their listeners.
- It doesn’t take fancy equipment. All you need is a device with a microphone to get started (and Screencastify! Read on to learn how).
- Provides students with voice and choice. Students are given the opportunity to empower their voice and ideas.
- Engages students authentically. Students have the opportunity to foster connections with others, building their empathy and connecting with their community.
- Builds a variety of skills. Not only do students build strong literacy skills, they also build skills in critical thinking, empathy, and organization.
- Provides focus and value on the skill development and not on the product. Assessment and evaluation of student-created podcasts can focus solely on the process as opposed to the product.
Screencastify Is The Perfect Choice For Student-Created Podcasts
If you’re a listener of our podcast, you’ll know that we are HUGE fans of Screencastify. It’s so easy and simple to use that anyone can get started in a matter of just a few minutes.
And the fact that it is so easy and simple to use makes it the perfect choice for students to use in the classroom as well.
The other bonus to using Screencastify is that it connects easily to your Google Drive. So any recordings that you make are automatically backed up to your Google Drive.
Screencastify is an obvious tool choice for creating videos in the classroom but it’s also an excellent tool for podcasts as well. Students can record a “video” and then export just the audio file (MP3 file) directly in Screencastify.
Finally, we also appreciate the privacy policies in place with Screencastify. Our district is pretty picky about what tools we are allowed to use and Screencastify is one of the few tools that has been given the green light!
Free vs. Paid Accounts in Screencastify
Screencastify is a freemium tool – you can do a lot with a free account but there are also options to subscribe and get more (detailed pricing overview).
Now you probably won’t want to get paid accounts for all of your students – that would be way too expensive! The free account is good enough for student-created podcasts.
In the free plan, recording is limited to 5 minutes in length. Screencastify Edit also limits you to 5 minutes in total.
While 5 minutes is a super short podcast episode, we think that this is actually a really good creative constraint for your students. Having this time limit will encourage your students to plan wisely, and promote critical thinking and decision making as they figure out what to include and what to ditch.
Steps For Student-Created Podcasts With Screencastify
1. Recording Student-Created Podcasts
First, if your students don’t already have the Screencastify Chrome extension installed, they’ll need to do that. The easiest way is to visit Screencastify’s website and install from there. Make sure they allow all the permissions during the setup for video and audio!
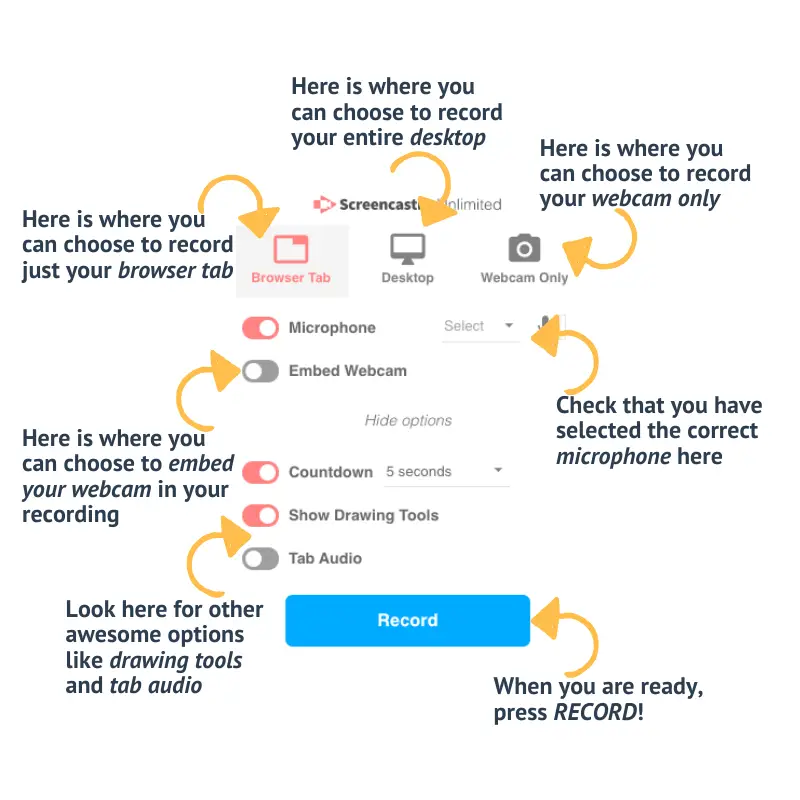
In terms of recording, there are a few options you’ll want to consider, such as:
- Are students working individually, in pairs, or in small groups?
- Are students recording in person or virtually?
- How are you scaffolding the planning process before recording?
In person recording is definitely easier than recording virtually. Students simply need to open a Chrome tab, click on the Screencastify recording extension and ensure that they have a device with a microphone. If recording in a group, students can huddle around a single microphone to capture all of the voices on a single recording.
Now in terms of recording settings, it honestly doesn’t really matter what your students select in Screencastify since they are only going to download the audio anyway. Have your students select what they are most comfortable with (webcam only, screen, or screen and webcam). The microphone settings are the most important setting here so make sure your students verify that they have selected the correct microphone.
From there, just hit record!
PRO TIP #1: Try not to pause, stop, or re-record audio. Your students can always cut sections out with the editor built into Screencastify and it’s actually very simple to do so. If your students make a mistake, have them pause their speaking for a couple of seconds and then start again WITHOUT touching the recording settings.
PRO TIP #2: Your students can also piece together several segments later in the editor, so there is no pressure to record everything in one take. Just make sure to use a naming convention that makes sense and makes it easy to piece together the podcast episode later on in the editing stage.
For virtual settings, recording student-created podcasts can be a little bit trickier. Our best advice is to have your students record the virtual meeting using the tab recording feature in Screencastify and ensure that the tab audio feature is turned on in the settings before hitting record. This works really great with Google Meet although would also work with any virtual meeting platform that is browser based.
2. Editing Student-Created Podcasts
Screencastify Edit is a great tool to use for cutting and piecing together student-created podcasts. The easiest way to access this tool is by clicking on “Open in Editor” on your main watch page in Screencastify. You can also go directly to the Editor by typing in “edit.screencastify.com” directly into the address bar.
The main tool that your students will want to use here is the CUT tool (looks like a pair of scissors!). When they’ve reached a spot that they want to cut in their clip, make sure that the clip is highlighted in yellow first, then click on “Cut”. If there is a section your students want to delete, they will need to cut on both ends of the section, then delete that section using the “Delete” (looks like a trash can) tool.
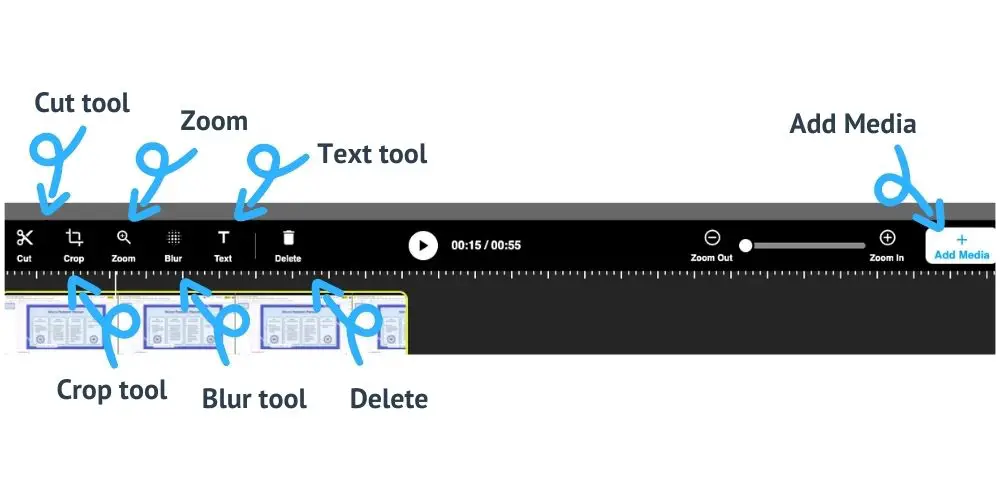
If your students recorded several clips that need to be pieced together, they can add additional clips to the timeline using the plus (+) “Add Media” button. Clips can be uploaded from the computer or from Google Drive.
Once editing is complete, the file needs to be exported back to Screencastify to download as an MP3 file. Have your students click on the blue “Export” button and select the “Export to Screencastify” option. They will then need to name their file and click “Save”.
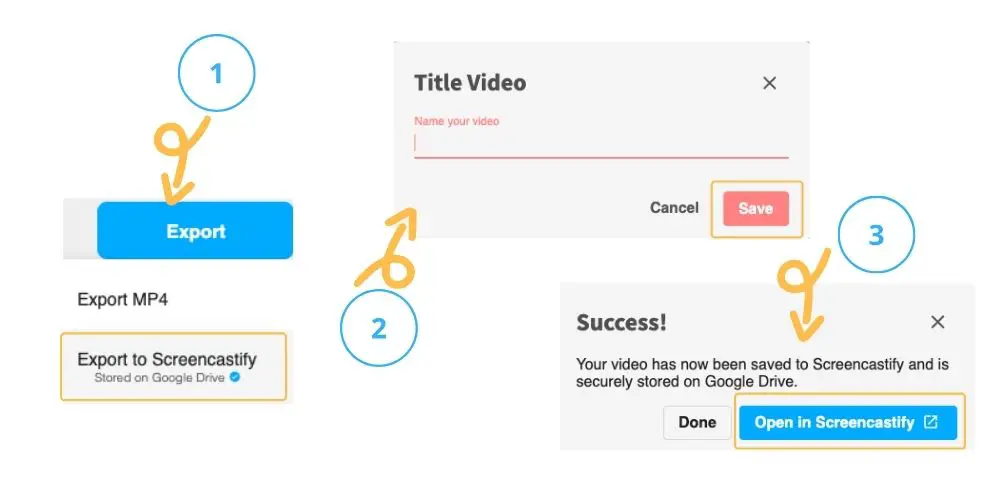
When the export has finished, students should click on the “Open in Screencastify” button to return to the main watch page in preparation for step 3.
3. Downloading Student-Created Podcasts
Once your students have finished all of their edits, downloading is done in one easy step. Start by clicking on “Export Video”, select “More Options” and then select “Export as MP3”.

It will take a few seconds to process, then click on the pink “Download MP3” button to start the download process.
Files are generally saved to your downloads folder on your device so you’ll want to start there to find your file.
4. Sharing Student-Created Podcasts
The last step you’ll want to consider is how to share your student-created podcasts. This is going to depend on how much you want to control privacy and sharing settings.
The first option is to have students upload their student-created podcasts to Google Drive. This provides the most control over privacy since you can share with specific individuals OR with your district OR even publicly. There are lots of options here to really customize how broadly you are going to share student work with a public audience.
Another interesting option is to have students share their student-created podcasts through submission in Google Classroom or whatever other LMS you are using (for example, Canvas, Brightspace, Schoology, etc.). Our recommendation here is to create a discussion post (or a Question post in Classroom) so your students can share the file with both you as well as the rest of the class. You can even build in peer feedback at this point which is why we really like this option.
You could also crowdsource audio files in a shared collaborative set of Google Slides (try this template!). For this option, students will need to upload their audio file to Google Drive first and make sure they set appropriate sharing settings for this file. Then they can add their audio file using the “Insert” then “Audio” option in Google Slides. We like this option because your students can also create Show Notes to go along with their episode right in their slide!
If you want your student-created podcasts available publicly, one great option is to use anchor.fm. To protect student privacy, we highly recommend that only you, as the teacher, create an account so that you are publishing on the behalf of your students.
Want to Learn More About Podcasting or Screencastify In The Classroom?
Check out our episode on podcasting in the classroom (E050).
Interested in learning about the latest and greatest features in Screencastify? Check out our Screencastify Updates podcast episode (E064).
Need some teaching ideas with Screencastify? Check out our Amplifying Student Learning with Screencastify episode (E034).