In this episode, we are revisiting our favourite EdTech tool of all time: Screencastify! We are going to share some new updates that they have released, discuss some ways that you can use it in your classroom.
If you like what you hear, then share this episode with a colleague or friend, and make sure you subscribe so that you don’t miss out on any new content! If you are able, consider supporting the show by buying us a coffee!
We would love to hear from you – leave a comment here, OR check out our FLIPGRID!
Show Notes
This week, we are talking about Screencastify. They have come out with some cool updates recently that are pretty darn awesome, so we thought we would go over them and share them.
Our previous episode all about battling negativity was definitely a little more negative than we had intended, so an episode about our favourite edtech tool will help balance us out a bit, and bring some excitement back.
Here is the official update from Screencastify.
What’s New?
- Integration of interactive questions to videos
- Analytics
An important factor to keep in mind is that the whole process of creating a Screencastify video has not changed. Once you have recorded the video, it is then that you can add these features.
If you need a refresher as to how you use this tool, check out these EduGals episodes where we go over Screencastify in more detail:
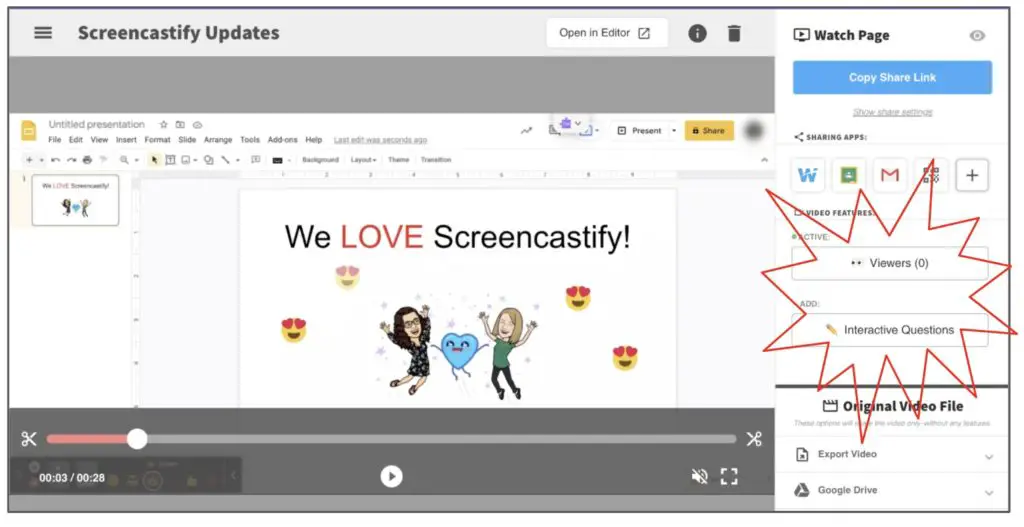
Once you are done recording, your video will open in a new tab called the Watch Page. It is in this new tab where you will see the option to add interactive questions.
Alternatively, if you would like to edit your video, add more media, etc. you would then go and open the video in the editor to make all of those changes before you add interactive questions.
Here is how you access your previously recorded and/or edited videos in Screencastify. First, click on the extension. From there, follow these steps:
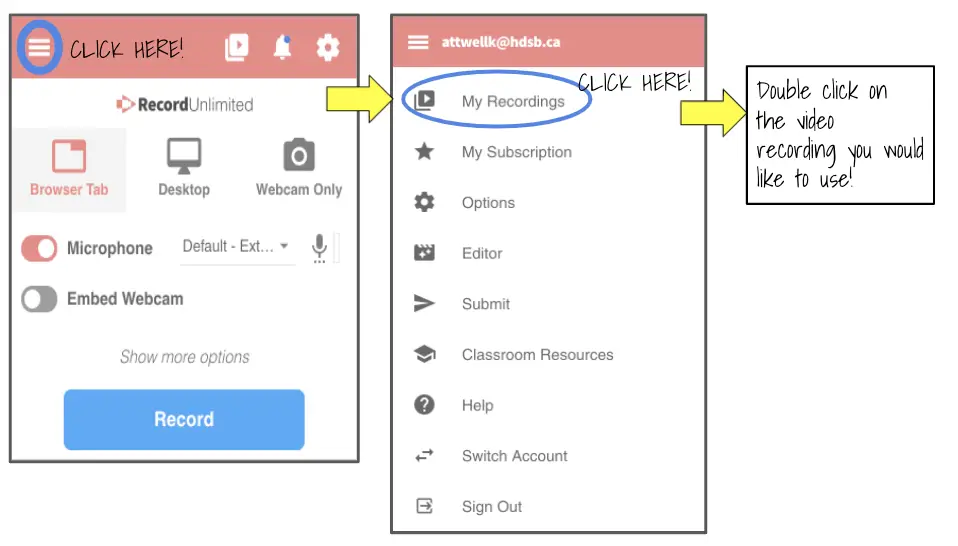
Once you have selected your video and double clicked it to open it, you will see the newly updated Watch Page, where you can access these new features!
Interactive Questions
The first update that Screencastify has introduced is the ability to add interactive questions to videos that you have created.
From the Watch Page, click on the “Interactive Questions,” and it will open up a new window that looks like this:
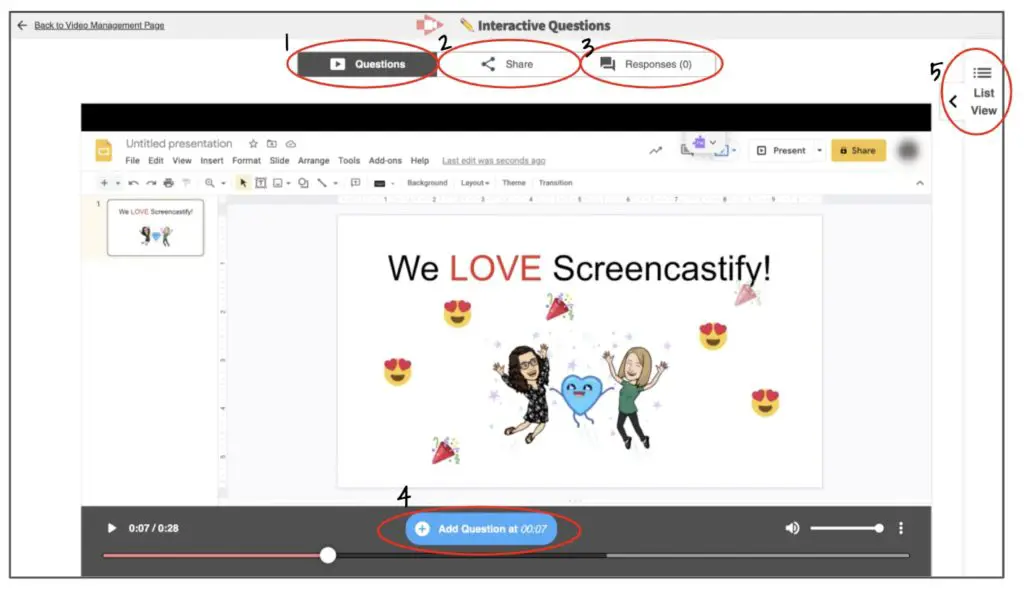
It is in this window where you have five different tabs or options:
- Questions – Default upon entering this window; This is the page or tab where you can add your questions
- Share – Once you have added your questions, you can click on the “Share” button and select the way that you want to share your video.
- Responses – After sharing your video, you can click on this tab to view the responses to the interactive questions
- Add Question at 00:00 – This is where you play through the video and select the time where you would like to add a question
- List View – Once you have added at least one question, you can click on List View to see all of the questions you have created.
This area is essentially your central hub for you to create, disseminate and then verify the responses.
To create the questions, you don’t need to have them all thought out and planned ahead of time. At the bottom of the screen, there is a play button – click on this play button to watch and listen to your video. Once you reach a point where you would like to create a question, simply click on the “Add a Question” button.
A new window will pop up where you can put in all of the information for your question.
Here is a screenshot of that question window with an example:
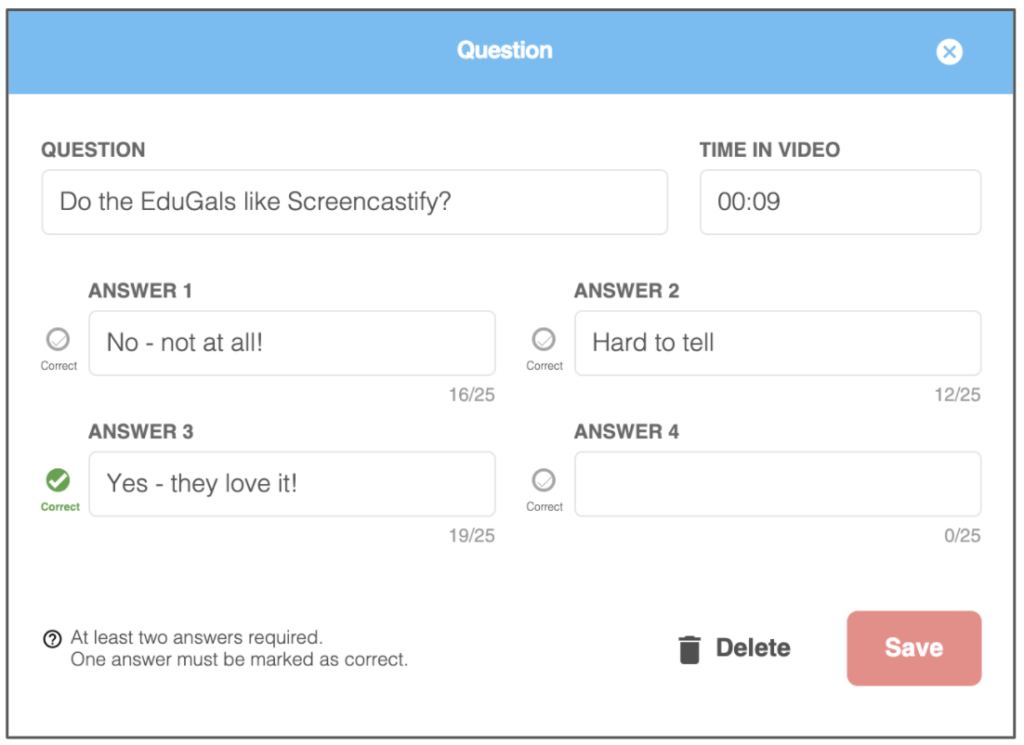
Once you have input the question, possible responses, and checked the correct answer, click on “Save.” Then continue to play through your video, and add more questions as you see fit.
It is such a simple process to add questions, etc. in Screencastify. They have really thought about how to make this tool easy to access and use.
As you are creating your answers, keep in mind that you can only have 25 characters in a potential answer. Also, you can only do multiple choice (with at least two answers), and only one answer can be correct.
Once you have created your questions, you can then click on “List View” to see all of the questions you have added, and you can access the question editor.
There are different ways to share this new video with interactive questions. Here are your options with the pros/cons:
- Share tab from the Interactive Questions page
- Pros: Amazing Google Classroom integration! Simply click on the “Share to Classroom,” select your course and choose how you want to share it within Classroom. You can create an assignment, ask a question, make an announcement or create material. SO MANY AMAZING OPTIONS!
- Cons: Not many sharing options here. You only have the options of sharing it via a url, or sharing it to Google Classroom
- Watch Page – Click on “Back to Video Management Page” to return to the watch page.
- Pros: Many options (URL, Wakelet, Google Classroom, Gmail, QR Code, and more)
- Cons: Have to navigate back to the Watch Page
If you are choosing to go back to the Watch Page to share, you can easily share the link. Right below the “Copy Share Link” are the share settings. If you haven’t added interactive questions, but still want to track the analytics to see who is watching your video, then you will want to edit the share settings.
You have many options to choose from, and you have two areas to consider. The first is who can access the video. You can select private, anyone with the link, or anyone in your organization.
The second area is how you want to track the analytics. You can select anonymous, by email address or by nickname. It really depends on the purpose of your video and how you want to use the data collected as to which option you will choose.
Below the new features, there is a section called “Original Video File.” This has share options for the original video file that will not have any interactive questions or analytics.
The options for exporting the original file are: EdPuzzle, YouTube, embed code or downloading the file. You can also share via Google Drive with a Drive link. It is important to remind you that these options will not have any interactive questions or analytics available at this time.
Analytics
Analytics is a great new feature that will help you track who has (or has not) viewed a video.
To access the analytics, click on the eyeballs “Viewers” button. A new window will open, and it will list the viewers, their email address, when they most recently viewed the video, and how many times they have viewed it.
Responses
To access, you can click on “Looking for Interaction Questions responses? Click here” from the Viewers button – it will take you back to the Responses tab of the Interactive Questions page.
On this page you can see the total number of responses, average score and average number of questions answered. It will also list responses by name and score.
Currently, there are two tabs greyed out that say “Coming Soon” when you hover over them: “Students” and “Questions” – not entirely sure what these will look like, but we’re excited to find out!
Based on the category of average number of questions answered, it is clear that students can skip through videos without being forced to answer the questions. That combined with the use of analytics to track student progress brings up an important question about how educators trust students.
Jesse Stommel has an awesome workshop where he talks about the importance of trusting students, and trusting teachers. Be sure to check it out!
Screencastify has done a great job with these updates to really increase their value and usefulness for educators. As a free tool, it now has so many options and ways that we can use it in the classroom.
How to Use These Screencastify Features?
It’s great to know how to use a tool, but sometimes the more important question to ask is “how can I use this tool in my classroom?” Here are a few ideas that we have for using these new Screencastify features in the classroom.
Feedback – Consider recording a video of yourself providing feedback to students, and insert a question or two throughout the video to give options for students to meet with you for further explanation, to let you know they understand, etc.
Staff Meetings – PD can be really dry. Why not record the PD, and incorporate a question or two to show that they have completed the PD, and an option for extra help or clarification on points.
Escape Rooms – You can create a digital escape room with short videos with questions.
Program/Parent Nights – You could have a video introduction with a question at the end that asks if parents want to speak with you for more information, etc. You can see that response, their email address, etc. to then reach out to families.
Polling Staff – This is a great way to poll staff and have them share their opinion on something. It changes it up a bit, and isn’t just another Google Form.
How would YOU use this tool and these features? We’d LOVE to hear from YOU! Leave a comment on our site, or leave a message on our Flipgrid!