Do you need to organize and clean up your Google Drive? Well, you are in the right place! Keep reading below to learn about how to find orphaned files, and how to find and keep your files easily organized. We’ll share strategies on how you can organize and clean up your Google Drive, especially with the new storage updates with Google Workspace!
Google has recently announced that storage will no longer be unlimited, but will instead be a shared limit for an entire Board or District. This could have some pretty significant impacts on the way that we use our Google Drives.
Before we dive into some strategies, we are going to share more details about these upcoming changes, and how this may affect educators.
We’ve also created a podcast episode to go along with this content. Listen below to hear our conversation about how you can clean up and organize your Google Drive!
Google Workspace Storage Updates
As we have said, there are some updates that are going to affect educators and how they use and store files in their Google Drive. Here are some of the changes that will likely have the biggest impacts:
Files Created from Google Workspace
Currently, Google docs, slides, etc. created from your Google Drive do not count towards your storage limit. With the new changes, these files will now be counted in your storage limits. On top of that, if you edit or change a file after the rollout, that doc will then count towards your storage. This will start to come into effect as of June 1, 2021. Check out the full update here.
This has some pretty significant implications on how teachers approach their Google Drives. Boards or Districts will then have to share a finite amount of storage. It is quite a high amount of storage, but adds up quickly if you have been a Google Board for a while.
These Google Workspace updates will come into play as of July 2022 – so we have time to help you get organized! It will also depend on which edition your Board or District has of Google Workspace – check out this site to see how it will affect you and your colleagues!
Where do we find our storage amounts?

To get to your individual storage amount, and to see which files are taking up the most space, head to your Google Drive. From there, Storage is located at the bottom left of your Drive locations.
If you click on “Storage,” Google will list the files taking up the most space (from largest to smallest).
Videos and other larger media files tend to take up the most space. You don’t have to delete them, necessarily, but it gives you a chance to see what is causing your Drive storage to add up!
One thing to remember if you have a personal Google account: the limit is 15GB, and this will add up quickly!
Apparently Rachel had a video in her Drive called “Fainting Goats” – are you as curious about this video as we were?! Check it out here!
Overall Organization Tips and Ideas in Google Drive
Google has some great overall tips on how to use your Google Drive. Be sure to check them out here.
Here are our tips as educators that have become far too comfortable with our Drive madness:
Assignments in Google Classroom
Whatever you do, make sure you return ALL assignments back to students in Google Classroom. If you don’t, you will maintain ownership of those files, and they will contribute to your storage!
Orphaned Files/Documents in Google Drive
Google has made it super simple to create new docs, slides, forms, etc. in Google Drive – docs.new, slides.new, etc. is super convenient! With that, however, is the overwhelming issue of orphaned files.
If you are similar in abandoning these files, and have a long list in your Drive, consider attacking it 10-15 files at a time. It does get easier – and use this as a reminder to organize your files as your create them! Avoid the mess of orphaned docs/files ahead of time.
Numbering System in Google Drive
Consider setting up your folders, files, etc. in your Google Drive by naming them with a number in front. That way, your most important or relevant folders are easily accessible as you enter your Drive.
Once you are done with those folders (for example, you are starting a new semester and teaching a different course), you simply rename your folder again, removing the number, and you are good to go!
Colour Coding Folders

This is an easy way to help make sure your important folders stand out.
To add a colour to your folder, right click on the folder, then click on “Change color” – then choose your colour!
You can design a system where a certain colour designates a particular area of your practice (eg. tech help, chemistry, ESL, etc.), or you can just make your most important folders stand out a little more by adding some colour to a few of your most important folders.
Add a Description to Folders
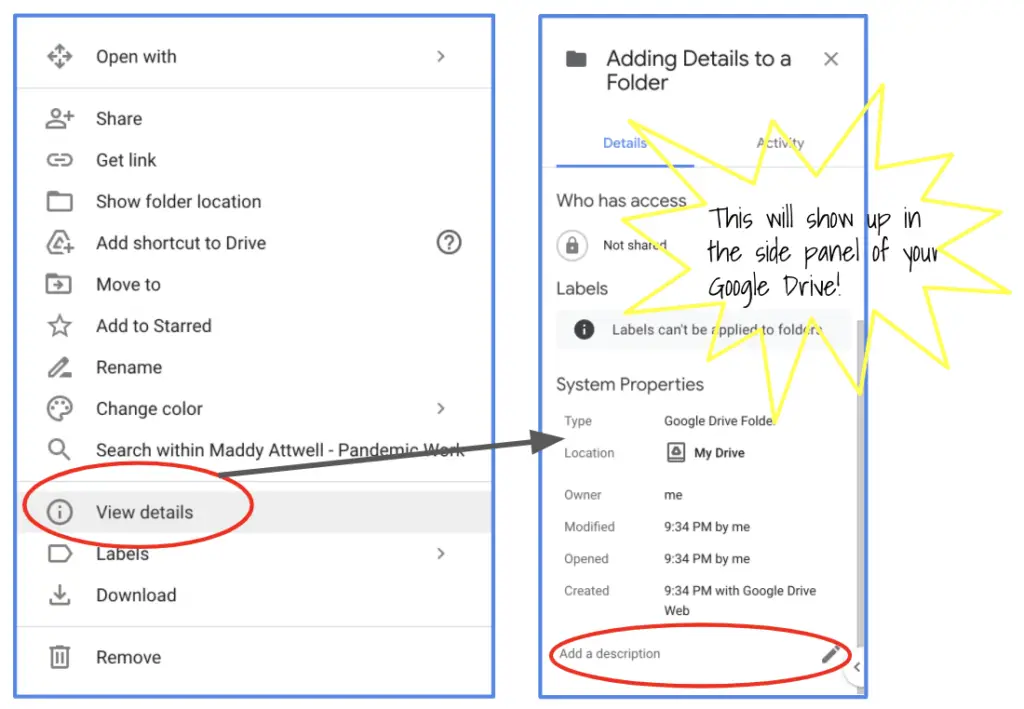
This is a great way to make it easier to find files or folders in your Google Drive.
To add a description, right click on the folder; click “View details.” The adding details will open up in the side panel of you Google Drive.
Scroll down and click on the pencil or the text to add a description. Be as specific as possible, adding keywords that describe the files you have stored in that folder, as this will allow you to more effectively search your Google Drive.
Star Important Folders or Files

This is another easy and efficient way to find folders or documents that you want to access often or more easily.
To add a folder or file to Starred, right click on the item, and click on “Add to Starred.” Now, if you click on “Starred” along the left hand side of your Google Drive, you will have quick access to all of the folders and files that you have “Starred.”
Word of caution: Don’t overuse this feature! It becomes too busy if you add too many files and folders to this area of your Google Drive.
Group Like Resources Together
One way to keep your Google Drive trimmed down, is to group folders and/or like resources together. For example, if you have a bunch of folders that you no longer use regularly, consider creating a folder that will store these. One example is “Older Resources” – this could be the folder that stores folders, files, etc. that you haven’t used for a while. This way you still have the items, but they aren’t taking up space in your main Drive’s list of folders and files.
Leave Special Folders Alone
Not all folders should be changed or moved. Folders such as Assignments (Google Assignments), Classroom, Meet Recordings, Meeting Reports, Fluency Tutor, Screencastify, Screencastify Submit, etc. are important for the use of those tools. If you rename or move these folders, you risk messing up how that tool functions.
So, be sure to leave these folders as they are so that you do not interrupt your productivity later when you go to use those tools.
That being said, you can ADD folders inside of these. Consider creating an Archive folder so that you only have relevant files or folders easily accessible.
Priority Tab & Workspaces
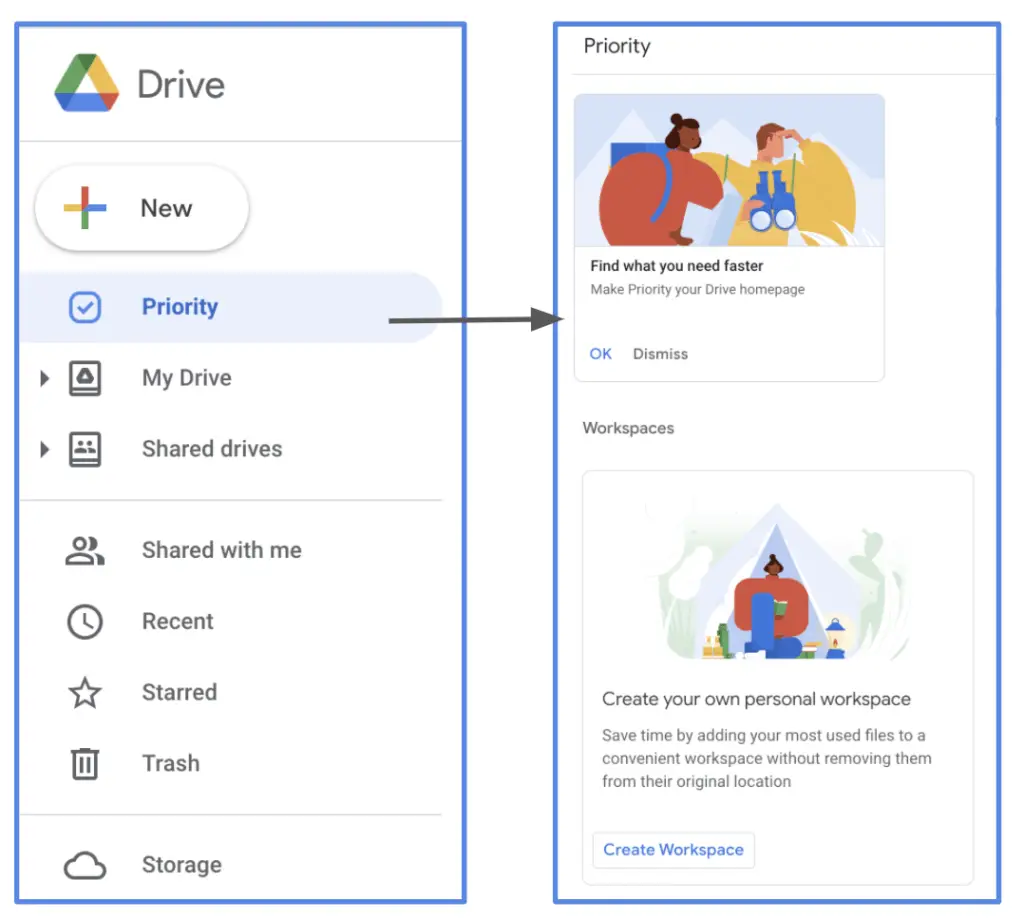
This area of the Google Drive is often under-utilized. To first access, click on Priority along the left hand side of your Google Drive. This will open up the Priority area.
The top section will show files that Google believes are important.
The bottom section is called “Workspaces.” This is where you can create a space, and add files that you need to access often. It is perfect for current projects you are working on, and keeps files at your fingertips.
To add files, you can add from the Workspace itself (up to 25 files!), or you can right click from your Drive, and add it to the specific workspace.
Once you are done, you can also hide your workspace. That way it isn’t visible at all times, but still there should you need it again.
Don’t Organize Your Shared With Me folder!
While you may be on a clean up kick, and you want to keep your momentum going, be sure to stop at organizing the Shared With Me folder. This just simply lists all of the files that others have shared with you.
Recent Folder
This is a great place to help you find files that you have been working on, but can’t seem to figure out where you have stored. Once you have found them, then move them to the folders, etc. where you want to store them! This is a great way to upload and get organized.
Grid View vs List View
While organizing, you may want to consider changing the view. Grid view is perfect for coloured folders, previewing files, etc. so a perfect fit for organizing your Google Drive.
Search Toolbar & Advanced Search
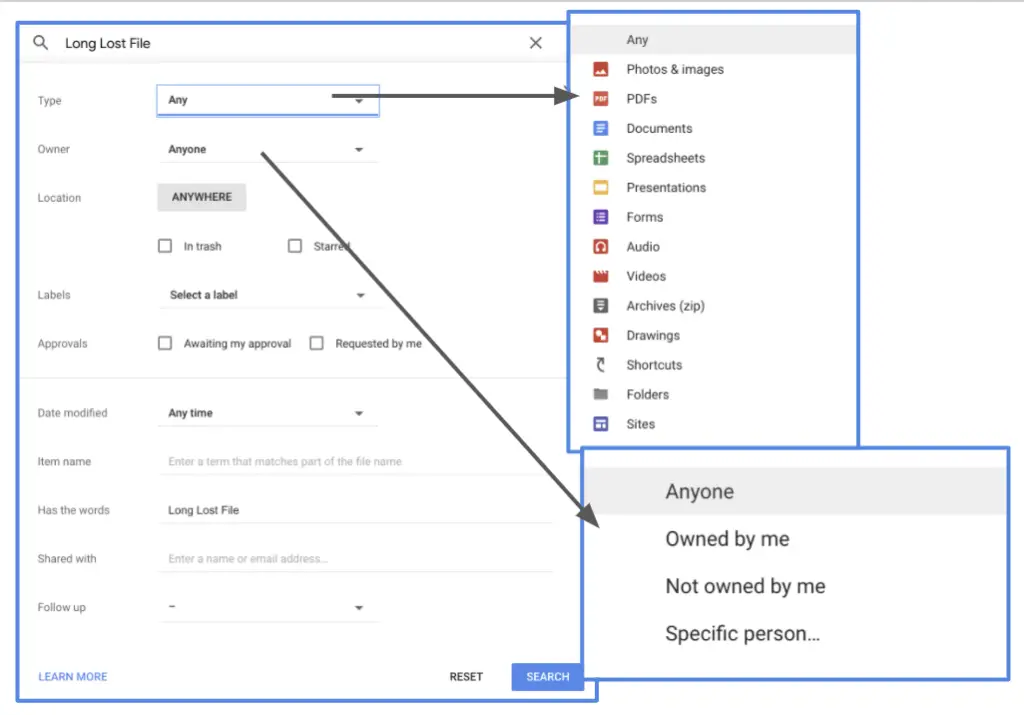
The search function is great for when you are certain that you have a file, but can’t remember where you have it stored. Type in a keyword or what you think the title may be, then click on the down arrow to open the advanced search options.
From there, choose your file type, specify who owns the file, and go through the rest of the search fields to help you narrow down the search and find your long lost file.
A newer option that is now available: When you click on the search bar, your Drive will show you people you have recently shared files with, as well as file types. You can click on one of those people or file types to show all of the files that person has shared with you (or all of the file types you have recently opened or modified).
The advanced search function is also a great way to locate files that you haven’t modified in years –
Named Versions VS Copies of Files
This option is a great way to minimize the number of files that you have in your Google Drive that are actually just copies that you’ve made to then make simple edits based on student group, etc.
Instead of making copies, go into the Version History and name the current version. This way, you can have multiple versions of a test, assignment, handout, etc. that is customized based on your group of students, semester, etc. And the great part? You can go back and forth between named versions without losing any of the versions!
Do you have any tips or tricks to help organize your Google Drive?! We’d love to hear from you! Leave us a comment below!


