This week we are talking all about Wakelet. We will go over how to get started, and how to maximize its use for you and your students.
If you like what you hear, we would love it if you could share this episode with a colleague or friend. And make sure you subscribe so that you don’t miss out on any new content!
We would love to hear from you – leave a comment here, OR check out our FLIPGRID!
Show Notes
This week we thought we would share a pretty neat tool that can be used to curate resources all in one place: Wakelet!
How to get started on Wakelet
The first step is to go the Wakelet website. You can then sign up for an account, using one of the many options that they have: Apple, Google, Microsoft, Facebook or email. So many options!
They will also ask for your name, email address and birthdate. Wakelet asks for birthdate because users must be 13 years or older to have an account.
Once you have inputted that info, you then get to choose your username. They suggest for you to match your username with your Twitter handle or a username that you use in other platforms.
After you have chosen your username, you can now get started with Wakelet! Consider connecting with us on Wakelet!
Set up your profile in Wakelet
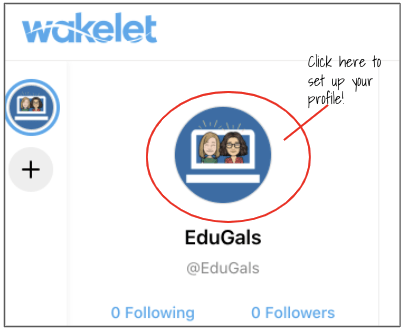
To set up your profile for the firs time, click on the round circle icon above your username. This will take you to your profile page.
In this area, you can set up a header image. If you want to create your own header, you could try out Canva (image size guide)! Otherwise, Wakelet has a variety of images available from Unsplash.
Don’t forget to add a profile picture, and write a bio to share a little bit of information about yourself.
Within your profile page, you can also add different sections to your profile – this is a great way to organize your collections. You can sort into subcategories, such as personal, teaching, Professional Development, etc.
Once you are done setting up your profile, click on “Save” and then click on Wakelet at the top left of your screen to return to your home page.
Collections in Wakelet
A collection is where you can curate different resources on a specific topic. To give you an idea, we have created a collection all about how to use Wakelet with students and/or parents. You can check out our collection here!
To start your own collection, click on the “Create a new collection” box from your home page.

Add an image that shows what your collection is all about. This helps your students, colleagues, and even YOU to know which collection it is, and what you have saved to it.
You will also need to write a title and a description for your collection. Keep the description brief, but make sure it is clear to anyone that opens your collection what they will be able to find.
From there, you start to add resources – the fun part!
Adding Resources to a Wakelet Collection
Once you’ve set up the details, click on the green plus sign to add a resource to your collection. Here are the various options that you have:

URL – This one is fairly straight forward. Simply copy, then paste the URL for a site that you want added to your collection.

Text – This has a few options! You can add headings, bulleted lists, hyperlinks, and you can change alignment of the text as well.
There are quite a few options to customize text in a collection.
YouTube – This is a great option for students to view YouTube videos. If you add and view a video from a collection, there are no ads, and it won’t autoplay recommended videos afterwards.
Tweets – Have a tweet that you want to save or post to a collection? Look no further!
Bookmarks – If you have bookmarks saved in Wakelet, you can easily access them to add to your collection.
Image – You can upload an image from your device, or choose from Wakelet’s library of Unsplash images.
Upload PDF – This is exactly what it sounds like.
Google Drive/OneDrive – You can easily add a file from your Drive to your wakelet! This is great for setting up weekly work, hyperdocs, etc.
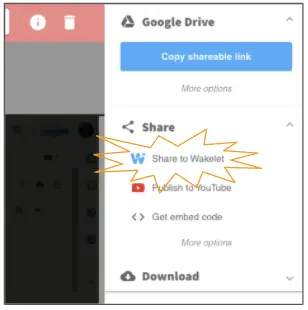
Video = This is actually a link to add a video from Flipgrid!
While not listed in the tool bar, you can also add a video directly from Screencastify! From the video, you have the option to “Share to Wakelet.” Want more info? Check out this guide from Wakelet!
Collection Settings
From within your collection, at the top left of your screen you will see a settings cog wheel. Click on this to see the different settings that you have for your collection.

First, you can add a background image to your collection. This will change the grey/blue colour to the image that you upload or choose from their library. The resources you have added will still have the white background, it only affects the area surrounding the resources.
Next, you can choose to turn on or off sharing. If you choose to turn sharing on, it allows others to copy your collection.
The collaboration setting (if turned on) will allow all editors to edit and delete items in the collection.
Beside the settings cog wheel is the invite button. This allows you to invite specific contributors to your wakelet collection using a link, a code, username or email. You can also manage contributors in this area. The benefit to adding contributors using a link or code is that it does not require an account to add to that collection! This is great for students, as it protects their identity and their personal info.

Once you have added some resources to your collection, you will then see the option to change the layout, or to turn on/off easy reorder mode.
When trying to decide between layouts, try them out! See which one you like best, and go with that.
Easy reorder makes it easier to change the order that resources are listed, and to move them around.

Once you are done, you then need to decide the level of privacy you want for your collection.
Your options are: private, unlisted or public. If using it with students, we suggest you choose unlisted – only those with the link can view it.
When done adding all of your resources, click on “Done,” and you are now ready to share your collection! Don’t worry, you can always go back and add more if you want.
Wakelet Chrome Extension
Wakelet has a fabulous Chrome Extension that makes it easy to add a site to your collections.
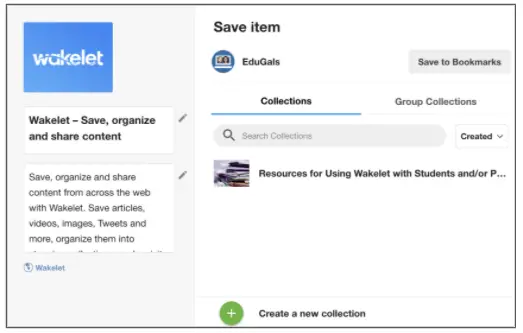
From a site, click on the Wakelet extension. A window will open. You can choose to save the site to your Bookmarks, one of your Collections (or create a new collection),or a group collection. You can also edit the title and description of the site.
Quick and easy to add!
Wakelet App for iOS and Android
Have an iPad, or cell phone? You can save different resources easily from your device by simply adding the Wakelet app. A definite perk: do you use Twitter? If you have the app installed, a Wakelet symbol will appear as an option when viewing a tweet, and you can click on that to add it to your Wakelet collection. Much easier than trying to go back later and find it!
Spaces

Spaces are areas in Wakelet that you share with others to create different collections. To create a space, click on the plus symbol right below your profile picture along the right hand side of your screen.
It will take you to a screen where you can enter the name of your space. Alternatively, if you have been given a code to join a space, you can enter that here as well.
Next, you get to add people to contribute to the space, and you can start creating collections. This is great for colleagues collaborating, however all users need to have an account in order to be a part of a space. You can add a name and publish a profile for each different space that you have on Wakelet.
Space Settings
Below the profile image, there is a section for you to enter information that will describe the purpose of the space.
Then, there are 3 different tabs or areas: Collections, Bookmarks, and Members. You can click on any of those three options and edit accordingly.
The Members tab is likely the most important when setting up a space. Here, you add/invite members to your space via a link or code, username or email. Each member that you add can be listed as either a contributor or an administrator. An administrator has more permissions than a contributor.
Spaces are perfect for course teams or grade teams. You can use this area of Wakelet to share resources or lesson plans easily. As we all know, Google Drive can get really busy and overwhelming over time, so this is a great solution.
Help & Inspiration

New to Wakelet? Click on “Help and Inspiration” to visit the help center, training center, get inspiration or to ask a question.
Inspiration – This option will take you to Wakelet’s “Surf School,” an area of the site where they show you different examples of how you can use Wakelet personally and professionally. They also share tips for sharing content, collaboration, and how students can use this tool. P
Wakelet Community
Wakelet’s Community is a great way to meet other educators around the world, and see how they are using Wakelet.
There are three different levels within their Community: Member, Community Leader, and Ambassador.
Each level has an application and different perks. As a community member, you will get to test new features and provide feedback before they are released, you get access to behind-the-scenes news and updates, and you can get swag for representing Wakelet.
You do need to apply to join a Community. For Community Leader and Ambassador, you also need to create within Wakelet in order to be considered for these levels.
No matter what you choose, the Wakelet community is a neat way to get more expand your PLN, and get to know the tool.
How can we use Wakelet?
It’s great to know how to use a tool, and how to get started, but it’s definitely important to know how you can really leverage that tool. Wakelet has some super useful resources on how to get started.
- Wakelet for Educators Resources
- The Educator’s Guide to Wakelet eBook
- Wakelet’s Remote Learning Guide
- Wakelet’s Remote Learning Resources Page
Here are some of the ways that we think educators can use Wakelet:
- News Letter
- Can share a collection
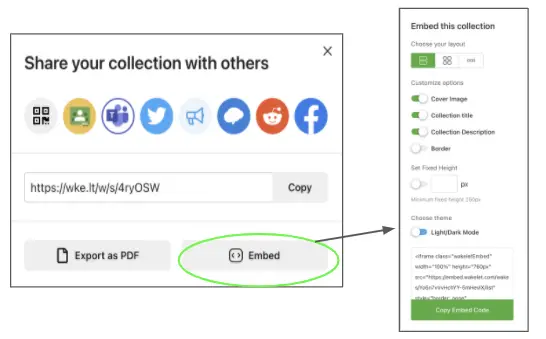
- Can embed in a Google Site or Brightspace! (click on arrow at top of collection – gives sharing options; click on embed; Will give options to customize the embedded collection)
- Lesson planning
- All of the handouts, activities, lessons in one place
- Creating choice boards with Wakelet
- Easy layout with different options
- Layouts are perfect for including extension activities
- Hyperdocs
- Similar to slides or a doc, but easier to organize all of the resources
- Group project resource collections
- Students can contribute their sources to a collection
- Annotated bibliographies
- Combination of text and sources
Another great feature about Wakelet? Accessibility is built in! Wakelet uses Microsoft’s Immersive Reader. An icon will appear along the side of a collection. It will then read aloud the text and the descriptions. You can also translate the text into over 60 different languages!
Overall, this is an excellent tool with a wide range of uses for educators and students! We love this tool, and hope that you do too.
Do you use Wakelet? Let us know how you use this amazing tool!
News & Updates
EquatIO & Jamboard!
EquatIO is now integrated with Jamboard (and more apps too)! So if you are a math or science teacher, you can now easily insert formulas, math equations, etc. in this amazing, collaborative space.
Google Assignments – Response to Veronika!
Veronika wanted to know if there was a way for students and teachers to easily track what work they have submitted with Google Assignments. She wants students to easily see what has been submitted, and what is outstanding.
Short answer: No – there isn’t a way for students to see all assignment submissions.
Long answer: Checklists in Brightspace! You can create a weekly, or a unit-based checklist for students to track their work. Both students and teachers can then see the progress.
This saves you (and students) from having to submit work in two places. The checklists live in the Content area, just like Google Assignments, so it’s easier for everyone this way.