We love using Choice Boards (aka grids, playlists, checklists, etc.) in our classrooms. They are powerful teaching tools that can be leveraged to help our students to be successful. Differentiation is built right into this type of activity, so it allows students to demonstrate their learning in a way that works best for them.
Don’t know what choice boards are? Choice boards are similar to hyperdocs, however they are used to present or display a variety of tasks that students can choose between to demonstrate their learning.
Interested to learn more about choice boards and how they can benefit your students? Then read on or listen to our podcast conversation below all about choice boards!
Why Choice Boards Benefit Students’ Success
Choice boards are a particularly great option for those in a hybrid or remote learning environment. Differentiation is built right into this format, which gives students more options, and allows them to demonstrate their learning in a way in which they feel the most comfortable and can show their strengths.
Choice boards are also great when used alongside flipped classrooms! Students can receive direct instruction through videos, readings, podcasts, etc., and then they can be provided with a choice board to work their way through the practical components of the lesson or module.
Tasks or activities in choice boards can include a variety of different forms: a slide deck presentation, a screencast, a brochure or some sort of written format, etc. The main idea is to give students choices that allow them to choose a format that demonstrates their strengths.
Get Started With Choice Boards Using A Template
There are so many templates available online. All it takes is a simple Google search, and it is amazing how much has been made available for educators to use as templates. Here are a couple that we have found useful.
For these, and more, be sure to check out this link to a Google Drive folder of templates that we’ve put together for you.
Types Of Choice Board Layouts
There are many different variations of choice boards. Other terms that you may hear in place of “choice boards” are grids, checklists, playlists, and more.
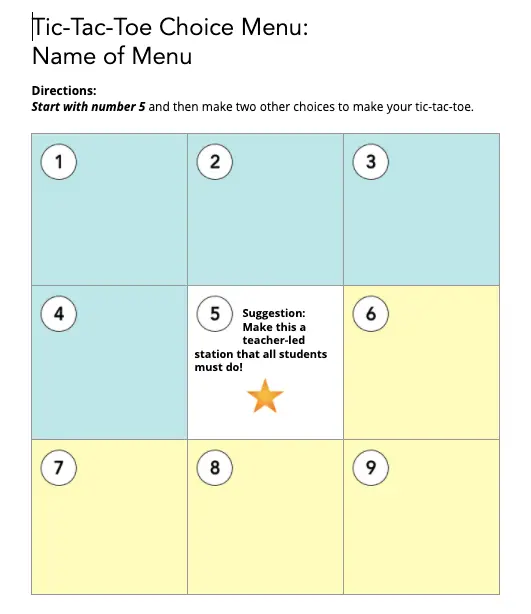
1. Grid (3×3) Choice Boards
In this format, the centre square is a must do for students. From there, the students have to do at least two other squares to create a tic tac toe!
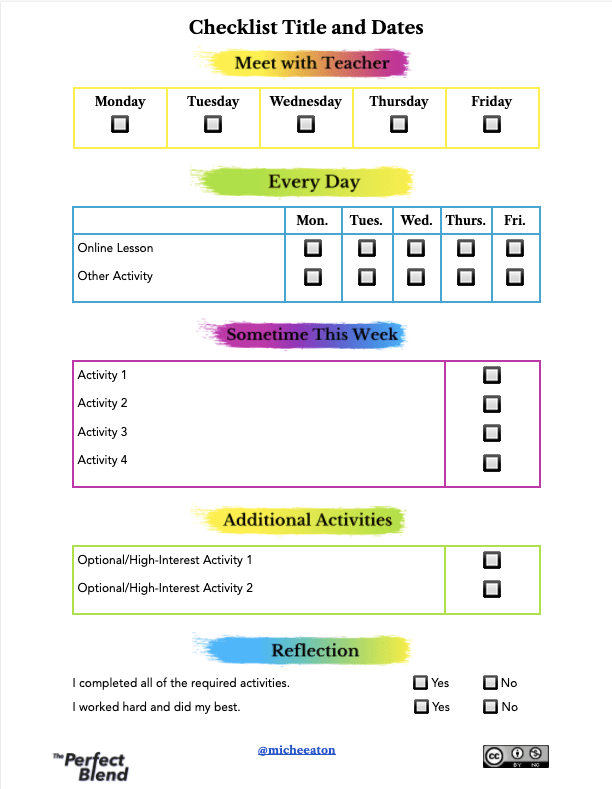
2. Checklist Choice Boards
Here, all of the options are categorized based on types of activities – must do’s, optional activities, etc. Students have to go through and check off at least one thing in each section. This format also helps them to stay organized and to ensure they complete everything needed for the week.
3. Playlist Choice Boards
This type of choice board is similar to a checklist. There are different categories, etc. that you have to check off; stipulation at the top that students need to achieve a certain number of points – each activity is then worth different number of points (based on complexity, level, etc.) – choices to pick from, etc.
Tips For Creating Effective Choice Boards
Check out the different options, and choose what works for you and your students. And remember, when searching templates, be sure to include the alternate search terms as well!
You might even consider adding different stations to your choice boards. In fact, we have a whole post dedicated to station-based learning that would integrate really nicely with choice boards – check it out!
As you are putting together your choice boards, keep in mind this word of caution: Try to minimize how ‘wordy’ your choice boards are, and try to incorporate visuals. You don’t want students to be intimidated by the choice board!
Also to consider: embed audio or video notes to help explain the choice board to your students – if they haven’t seen these before, it could be quite difficult at first glance!
With that in mind, it’s important to consider what tool you are going to use to put together your choice board. Slides are great for choice boards – easy to insert audio, video, images, etc. and students are comfortable with this tools as well.
A close second, in terms of tools, would be Google Docs. It’s a little more difficult to include audio/video and images in a more visually appealing manner, but it can be done!
If including audio/voice notes via comments in a doc, you need to remember to share the url the following way:
Replace “edit…” with “copy?copyComments=true”
And for those visual learners, here is a visual tip on how to make a copy of a doc with comments:
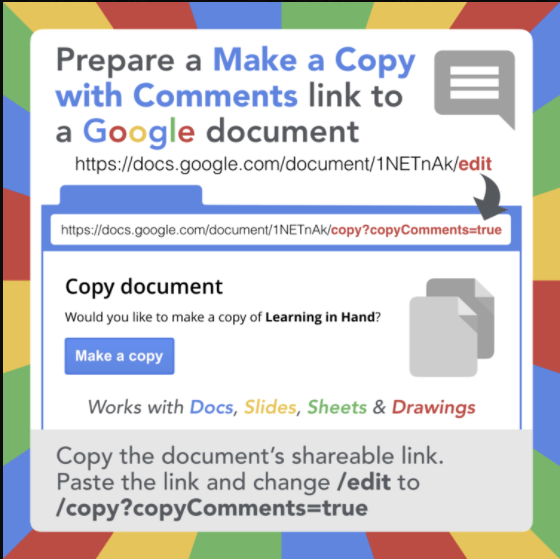
Huge shout out to Tony Vincent for this awesome visual to remind us of how to change the link to include comments!
Slides Mania Has Tons Of Great Choice Board Templates
Slides mania has a bunch of amazing slide templates that can be used for choice boards! She has included some that are set up more like games, or fun activities. They are also very visually appealing, which is sure to help keep students engaged!
You could take any of the templates from the education category and tweak them to make them choice boards. For example, the digital notebooks that she includes could very easily be customized into any format of choice boards.
Setting Up Your Choice Boards With Tasks Or Levels
No matter what tweaks you make, think carefully about the language that you use when constructing the choice board. For example, some choice boards may refer to “levels” of activities. Here in Ontario, we evaluate student work using the term levels, so it’s important to explicitly teach what it means in the context of a choice board, and perhaps even change the terminology to eliminate confusion.
Another option or idea is to break down the tasks or levels to include different targeted areas of assessment. You can have a task for each of the areas (knowledge, thinking/inquiry, communication, and application), which ensures that you cover all areas of evaluations.
Choice boards can also be skills-based, particularly for courses like English as a Second (or Additional) Language. Having options within all of the language strands (reading, writing, speaking, listening, and grammar), is a great way to ensure choice, while also having students complete activities that hit all of those skills.
Try The Grid System As A Unique Way of Setting Up Choice Boards
Stephanie Howell from Global GEG has shared her system of choice boards that she refers to as a Grid System. Check out her presentation. She uses the Depth of Knowledge levels to build her choice boards.
Digital Tools to Use Within Choice Boards
Knowing what choice boards are, and how to build them is a great start! Now let’s talk about the tools you (and/or your students) can use within choice boards.
1. Screencastify
We promise that we aren’t paid to advertise this tool – we just really love it! Teachers and students can use this extension to record a slide deck presentation, to record themselves delivering a speech or argument, etc. It then syncs right to the Google Drive, which is great for Boards or Districts (like ours) that have the GSuite.
And if you are looking to insert audio into Slides or Docs, you can even use Screencastify to create a video and download the audio only!
An additional option or feature that we haven’t yet played with is exporting animated GIFs within Screencastify. This could be really fun to try out with your students! It essentially is video only, with no audio, and it loops the video continuously.
There are so many options with Screencastify, and it can be used in and with other apps as well!
Whatever you do, keep student safety and privacy in mind (check out commonsense.org for a privacy rating for each of the different tools and apps that many people use).
2. Loom
Also captures screencast videos, similar to Screencastify.
3. YouTube
We often forget about YouTube as an educational tool. Truth is, YouTube has some great features that make it perfect for choice boards and more. In YouTube, a teacher can curate a playlist that they can then share with students. The teacher puts together all of the specific videos in one place for students to access.
Additionally, YouTube can be used to curate playlists collaboratively as well. Students can go and find the resources and contribute that video to the group’s playlist.
And when using YouTube, don’t forget to show students how to use closed captions, and how to slow down the audio – this will help make videos accessible to all learners.
4. Pear Deck or Nearpod
These two tools can be used to create interactive presentations – whole group, assigned for homework, etc. They add an element of interaction that a traditional slide deck or doc don’t provide.
These tools guide students through the lesson and provides feedback for the teacher.
5. Kahoot
Don’t forget that Kahoot also has templates that can be used in your classes! Direct Instruction lesson templates are available, and allow you to check in for understanding as students are going through the lesson.
6. Wakelet
This tools is amazing to curate and organize in normal times. Adding Wakelet as a way to organize choice boards, playlists, or checklists is an even better use of this tool, allowing you to curate all of the material/media that you want to use in one place.
As educators, we can provide options for our students, but it doesn’t mean that those are the only choices. Allow your students to choose their own tools! Provide guidance, but be open to allowing them to choose apps/tools for themselves.

Emphasize Creation Over Consumption In Choice Board Activities
An important point to remember as you begin to plan the tasks or activities in your choice board is to ensure that the activities focus more on students creating something instead of just consuming information. Consumption is certainly a component of learning, but you don’t want it to take over and become the focus of your choice board.
Choice boards can also offer reach ahead learning or extension activities as an option. This should help for those students that are highly motivated to keep learning, or who require an extra challenge.
We tend to cater to the middle when designing classes, so choice boards allow you to include all students, and to provide options that meet students where they are.
No matter how you dive in, remember to just go one step at a time. It doesn’t have to be included in every week or unit, and you don’t have to rush to quickly create a choice board that can be implemented tomorrow. Choice boards (and all planning, really) take time, so figure out a point later in your course where it could fit, and put together your choice board over time!
Choice boards also don’t have to be elaborate. They can be a choice between two tasks – keep it simple, and don’t overthink it! Doesn’t have to look beautiful, and doesn’t have to be elaborate.