This week’s episode is the first of a two part series dedicated to Google Meet. We will dive into all of the different features that you can use with this tool, to really maximize synchronous learning time.
If you like what you hear, we would love it if you could share this episode with a colleague or friend. And make sure you subscribe so that you don’t miss out on any new content!
We would love to hear from you – leave a comment here, OR check out our FLIPGRID!
Show Notes
As we head into Quadmester 3, we have now found ourselves back in face-to-face learning, but with a remote/synchronous component. As such, we thought that an episode dedicated to Google Meet is a really great tool to spotlight for an episode.
Be sure to check out these resources if you need Help with Google Meet, or you want to see What’s New in Google Meet.
How do you set up a Google Meet?
There are a few different ways to set up and access a Google Meet.
Calendar Event
If you set up a calendar event with a Google Meet link that repeats for the entire quadmester, you will have host controls as owner of that calendar event. This ensures that you will have host controls, and can prevent Meet bombs (often referred to as Zoom bombs) from occurring.
Co-teaching? Not a problem! You can transfer ownership of the event to another teacher to ensure that they have host controls.
An additional benefit of setting up a Meet link this way is that students can access the Meet by simply going to meet.google.com or by accessing the Meet app in their app waffle. When they have a scheduled event, these will show up at the home page for Meet with the time of the event.
Downside: You do have to invite your students individually to the event so that they can then access the link and have it show up at the Meet homepage, but you only have to do it once, so it really isn’t that bad.
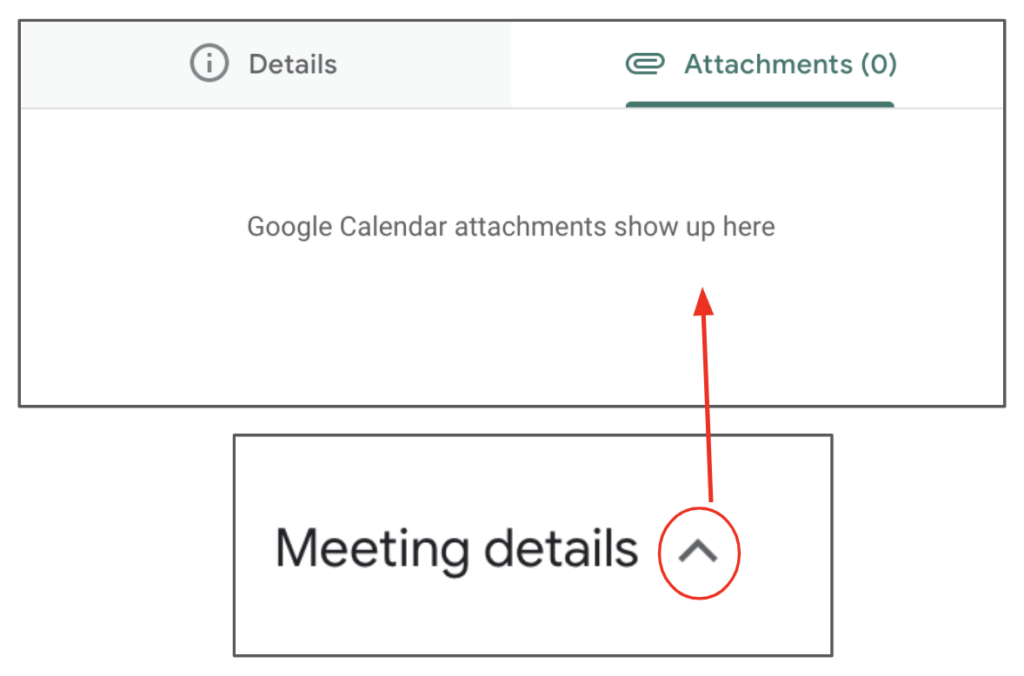
You can even take that the next step by sharing docs in the calendar event. This will then share those docs to the Meet itself, which can be found in the Details section of the Meet screen. The students must RSVP “yes” in order to see the attached documents.
Features in Google Meet
At the top right hand side of your Meet, you are going to see some symbols. Each of these are a different area or feature.

People/Attendees in Google Meet
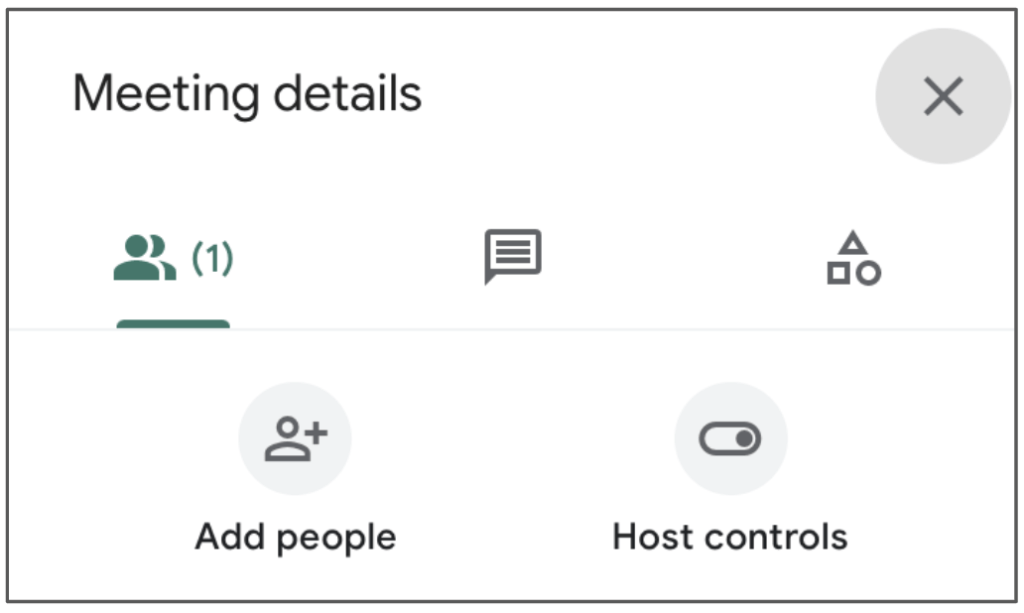
In this section of the Google Meet, you can add people, and if you are the host, you can click on the 3 dots beside an attendee and mute them or remove them.
In this area, you will also be able to see which students or attendees have their hands raised, and it will list them in order of who raised their hand first. As long as you are the host, you can then lower all hands or individual hands.
Adding guests can come in handy, particularly for students that tend to “lose” their Google Meet link. They will get an email, inviting them to join the Meet in progress, with a hyperlink for them to click on to join.
You can also call out to a phone number here. This will allow you to have a “conference call” with someone or multiple people.
In this area of the Google Meet, you can also access the Host Controls. This area of the Meet has a few different options:
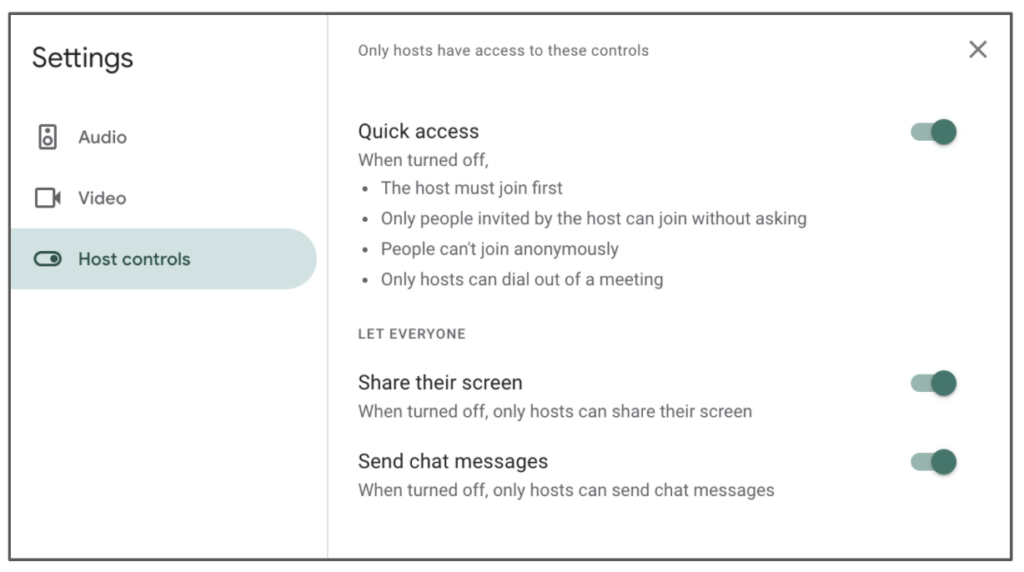
- Screen sharing
- Turn on/off screen sharing for guests
- Chat messages
- Turn on/off the chat box for guests
- “View all Host settings”
- Turn on/off quick access – If quick access is turned off, then it will essentially have the students “knock” and get approval to enter. This can prevent Meet bombs, and protect students from unwanted guests
Chat Box
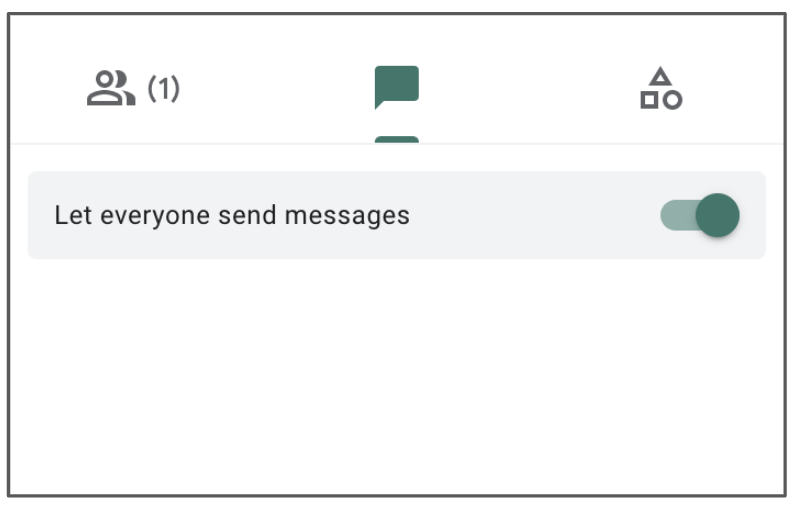
This section of the Google Meet is fairly straight forward. This is where students can type and read messages. This is also where you can quickly toggle on/off the ability for everyone to send messages.
Please note: If someone leaves and returns (host included), then they will not be able to see the chat history. This includes leaving the main room to join a breakout room.

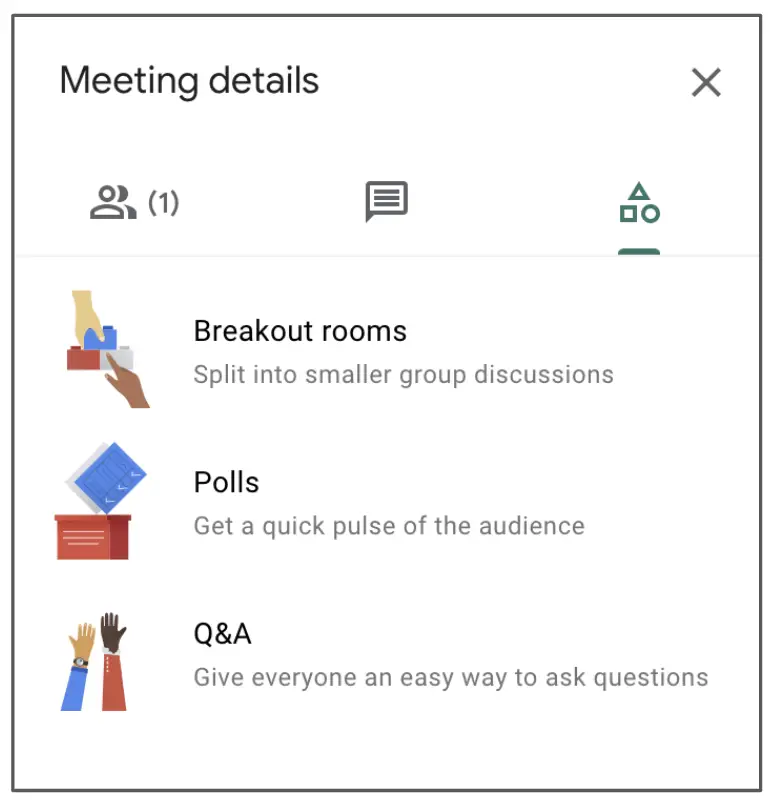
Activity Tab = Fun Features!
This is where you can access the interactive features within Google Meet. This area includes: Breakout Rooms, Polls and Q&A.
Breakout Rooms
In this section, you can create different rooms to make group work possible. You can drag and drop names, type names, or let Google Meet randomize the students into the number of rooms that you select.
Students will get a message to join a room, and once they click on it, will go directly from the main room to the breakout room.
The teacher can join and leave the various rooms, with the Main room always open as a space for students to drop in with questions. Teachers can also see if someone has raised a hand in a breakout room, so you can easily head to that room to help support that group.
There’s also a VERY helpful timer feature. You can choose your time, and it will count down and close the rooms once the time is up.
Breakout rooms can get messy if you have a very large group, but if students have RSVPed to an event, you should be able to go in ahead of time to organize the rooms.
Also: students on iPads and phones? These devices are not compatible with breakout rooms.
Polls Feature
Click to start a new poll. It is very easy to set up. Just simply type in your questions, the different options (up to 10!), and then save and/or launch when you are ready to poll your class.
You can also set this up so that students can see the results, or that the results are hidden from the class. This is great to gauge if students need time, check-ins on how they are doing, etc. You’d be surprised how many of our students could use a quick check-in to see how they are doing.
Q&A Feature
You can turn this on, and students can ask questions that they have. You could also ask them a question to gather data.
Great thing about the Poll and Q&A? The answers will be sent with the attendance data once the Meet has ended.
Google Meet Features on the Main Screen
Along the bottom of your main screen in Google Meet, you will find a bunch of different options. While fairly obvious, we thought we would share what they each do.
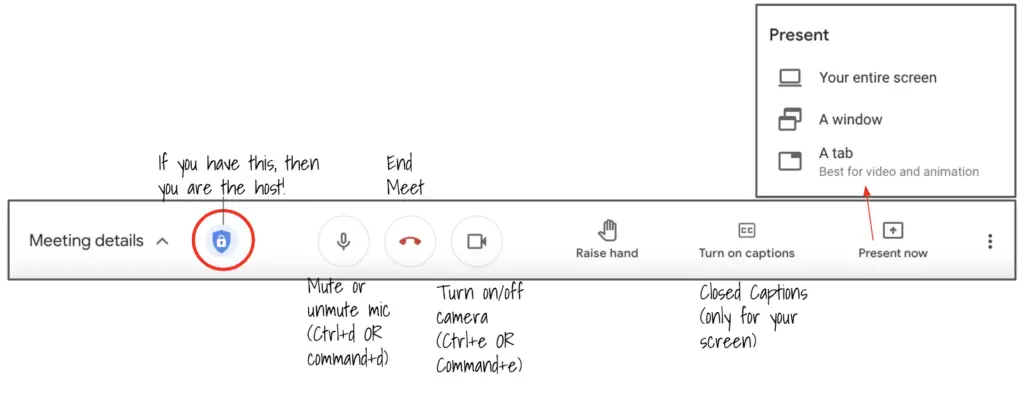
Remember: if you are going to share a video with sound, you want to make sure you select “tab” for screen sharing.
More Options
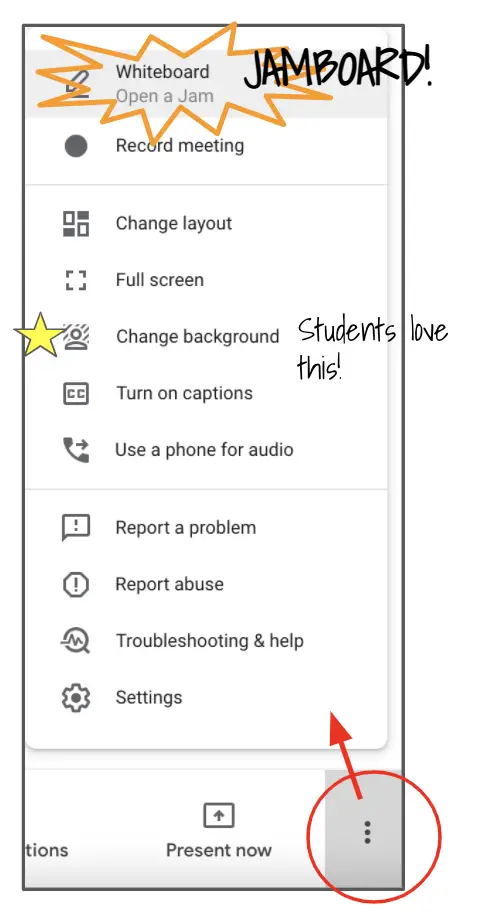
As Google always does, they have a “more options” menu in the form of your snowman/timbits icon. This has lots of options, so don’t be surprised when you click on it!
Cast this meeting
Have Chromecast? You can cast it to a device with Chromecast!
Whiteboard
This opens a Jamboard! You can start a new jam, or you can open one that you have already set up. Now that you can add custom backgrounds to Jamboard, there are so many possibilities! Check out our Blog post about how to add a custom background in Jamboard, or check out our jamboard episode!
If you select a Jamboard, and the sharing settings are not correct, it will prompt you to change this.
Record Meeting
Recording a Google Meet is a great option if you want to be sure to save the video for absent students, etc. Not Enterprise? You can record, but it won’t be saved forever.
Important note: If it is a calendar event, the recorded video will go to the Drive of the person that owns the calendar event. It will also attach to the Calendar Event, along with the chat transcripts
Layout
This is where you can choose the format of how the participants will appear on your screen. If you choose Tiled, you can then select how many tiles will appear on your screen by dragging the toggle up/down until you reach the number you want. It maxes out at 49, but that tends to work for most of our uses.
Full Screen
This one is fairly self explanatory. It will make your Google Meet full screen. similar to how it would work with a video.
Change Background
Changing the background is particularly enjoyable. This allows you to blur out or change your background. This is great because it allows students and teachers to have a sense of privacy while turning on their cameras. There’s no need to see everyone’s houses or workspaces, which is important to many of our students.
This can also be done prior to entering the Google Meet so that there is still privacy before you enter the Meet.
Turn on Closed Captions
This is the same as the feature on your main Meet screen. It will turn on/off Closed Captions for your screen only. Students will have to turn on their own in order to see closed captions on their end.
Use a Phone for Audio
This one we don’t use very often. It allows you to connect your phone and use it to listen and speak in the video call.
Help Options
- Report a Problem
- This is where you give feedback to Google!
- Report Abuse
- If a user is not using Meet appropriately, you can report it this way.
- Troubleshooting & Help
- This will open a window and share your system stats, and give you tips on how to fix issues you are experiencing.
- Settings
- This is where you can test your audio and video, and choose which input/output device you want to use.
- Noise cancelling – you can choose to toggle this on, and it will eliminate background or ambient noise.
- Using a document camera? This is where you select your document camera as the video!
- You can choose how you send/receive video resolution – if you are having a hard time with bandwidth, then switch it to standard
- Host Controls can also be accessed from here.
Stay tuned next week for Google Meet: Part 2! We will be going over practical uses and strategies, and how you can really make the most of Google Meet with your students.
News & Updates
NEW! Mote Certification
This audio recording Chrome extension has recently launched their own certified educator and Ambassador programs! Check out the details here, and be sure to add this to your list of edtech certifications for 2021.
Want more info about this extension? Check out our Chrome Extension Episode!
Chrome Updates
If you haven’t yet updated your browser to version 88, now is the time! Google has announced a variety of important safety updates that will help protect you and your identity.
They’ve also rolled out a QR code generator for any website that you are on! Simply highlight the webpage, and a new symbol will appear at the right side of the omnibox. You can also right click anywhere on the webpage as well. This will generate a QR code that can be downloaded. The best part? It has a Chrome dinosaur in the middle!