This week, we are diving into Google Read&Write: all of the features, and how you can use this Chrome extension with your students.
If you like what you hear, share this episode with a colleague or friend, and make sure you subscribe so that you don’t miss out on any new content! If you are able, consider supporting the show by buying us a coffee!
We would love to hear from you – leave a comment here, OR check out our FLIPGRID!
Show Notes
In this episode, we are talking all about Google Read&Write. But before we begin, it’s important to add this extension to Chrome if you don’t already have it.
Don’t have this extension? Click here to add Read&Write to your Chrome browser.
Please note: Teachers get a free premium subscription to Read&Write, so no need to worry if your Board or District does not have a subscription. Here is a link to a form that you need to fill out.
TextHelp (the company that created Read&Write) is actually one of the top 10 EdTech certifications we suggested in Episode 35 – something to consider if you think that this tool could benefit your classroom!
Once you have it added, the best way to get started with it is to play with it! Give it a try, click on the various buttons or options, and see how it works for you. TextHelp has also created a quick reference guide for the features in Read&Write.
Features in Read&Write
Let’s get started with the features available, and how to access Read&Write.
Please note: Not all features are available in all tools. For example, the features available in Google Slides are different than those available in Google Docs.

To open Read&Write from within the Google Workspace (Docs or Slides), click on the purple puzzle piece on your extensions bar.
You will have to give permissions the first time that you use Google Read&Write, but after that, a tool bar should appear along the top of your Google Doc (or Slide, etc.). The toolbar will look like this (minus the numbers):

- Check it
This is a spell check and grammar checking tool. Students can highlight a paragraph of text, click on the check it tool, and it will underline any possible errors.
If you click on the underlined term, it will bring up a drop down with different options for replacing that term or error. - Word Predictor
When typing, if turned on this feature will give word suggestions based on the last word that you typed, even mid-word! It can also read aloud words to help choose the right term. - Dictionary/Picture Dictionary
These are some of our favourite tools on the Read&Write toolbar. The dictionary will provide a variety of definitions based on various contexts, plus it will read aloud each definition as well.
The picture dictionary will show various picture representations of a word. These can also be copied/pasted into activities or evaluations to help give a visual representation of a term. - Read Aloud
Highlight a word, or section, or click at the beginning of a paragraph and it will read aloud the text for you. - Pause
This one likely doesn’t need any explanation. This is used along with the Read Aloud feature – this will pause any read aloud. - Stop
This feature will stop playing the read aloud of a text. - Screenshot Reader
If you click, you will get a plus symbol. Click and drag around the text that you want read aloud. It will analyze the text, then create a play/pause button within that area to play just that specific text. - Audio Maker
This feature converts the text to an audio file and will download the audio file to your device. - Screen Mask
This will grey out the background and focus in on a smaller bar/area of text. It helps you to focus and read from the screen. - Voice to Text (aka Talk and Type)
You speak, and it will type for you! This can be done in multiple languages, so it is great for any language class. As with most of these tools, - Translator
This is a great feature that helps students to ensure they understand what they are reading. The language that you want terms translated to needs to be set up in the Read&Write settings, but once it is set up, it is easy to use.
Students will highlight a word, and then click on the translator tool, and it will give different translated options. - Highlighters
There are four different highlight colours. Double click on a word, and select a highlighter. You can choose a purpose for each colour, or students can randomly choose a colour. - Erase Highlights
This does exactly what you think it does! Select the document, a highlighted word, etc. and it will clear all of the highlights from the selected text. - Gather Highlighted Words
This feature will gather all of the highlighted words, and will create a new document with those terms in a list. You can choose which colours to collect, and how to order them in the doc. That new doc will then link to the original document. - Vocabulary List
This is similar to the Gather feature. Highlight the words that you want to add to a vocabulary list, then click on the Vocabulary List feature. This will create a new document with the terms in a table. It will have the term, the definitions for that term (in multiple contexts), a symbol or picture definition, plus a space for notes. ELLs or language students will often use the Notes space to put a translation of the term into their first language. - Voice Notes
This feature will allow you to create a voice comment in a document. It is a maximum of one minute, but is a great way to give feedback to students, or even to give verbal instructions for a handout. The voice comment is a hyperlinked comment off to the side of the doc.
This is quite similar to the Mote extension. - Practice Read Aloud
This feature is great for language learners, or to check in on students’ reading fluency. Highlight an area of the text, and click on Practice Read Aloud.
It will open a new tab with the text. Students can practice reading it, and then record themselves reading the text aloud. Once done, they can listen and record again, and then they can share it with their teacher! It will then get emailed to the teacher so that they can listen and provide feedback, or track progress.
This is essentially a mini version of Fluency Tutor (also by TextHelp)!
Read&Write Settings
The settings for Read&Write can be accessed via the 3 dots menu on the R&W toolbar – all the way to the right. This is the area where you can choose the language for the translator tool, and you can customize a few other options.
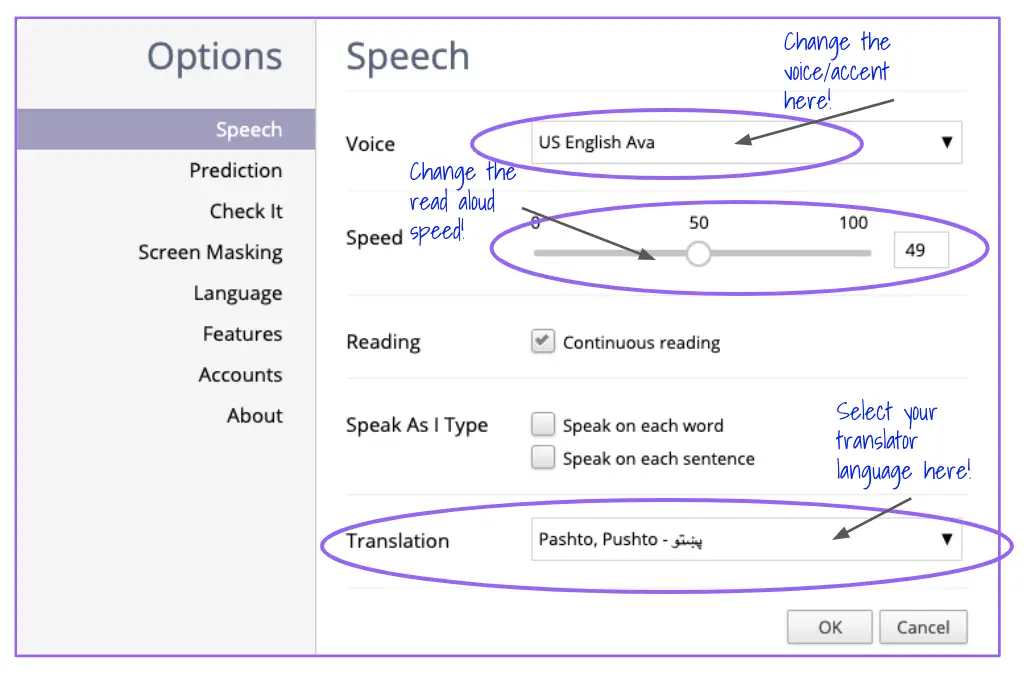
The first settings page will allow you to change the options that deal with speech: the voice/accent that reads aloud, the speed of the reading, continuous reading when read aloud is selected, option to speak as you type, as well as the translation language.
This main page is the most important settings option in Google Read&Write. The rest are fairly straight forward, and don’t have as much customization.
TextHelp Certifications for Google Read&Write
If you think that this tool will be helpful for you or your students, we strongly recommend that you work your way through TextHelp’s certifications for Google Read&Write. They really go over the basics, and get you comfortable with this tool.
Check out their certifications here if you are interested!
Google Read&Write everywhere!
Just a reminder: Google Read&Write features will vary depending on what you are using. If you are on a website, for example, there is also a simplify option that will clean up the ads so that it is easier to read and focus on the text on the page.
Google Read&Write Pricing Plans
TextHelp shares their pricing plans for Boards, Districts, Companies and/or individuals interested in Google Read&Write.
News & Updates
Google Meet – So many new updates coming!
- Mute all button
- toggle switch on/off to give students ability to unmute themselves
- End the meeting for everyone option!
- No one can stay on, it even end for those in breakout rooms
- Emoji reactions – with skin tone options;
- Improvements to Meet functions with low bandwidth
- Meet transcripts
- Breakout Rooms
- will be able to set up ahead of time in Google Calendar
Google Classroom
- Student engagement tracking is on its way!
- Only students in the Google Classroom can join the Meet, and only once teachers are in the Meet first!
- All Google Classroom teachers are co-hosts (host controls!)
- Rich Text Formatting!
- Bold, underline, strikethrough, etc – so much better!
- More offline access to Google Classroom, assignments, docs, etc.
- Mobile app update: Built in scanner to take pictures and submit assignments
So many more Google Updates! Check them all out here!