As educators, we have recognized the importance of using the tech tools we have to best reach and engage our students. Google Slides is such a great tool, and many of its features are often underused.
Google Slides is more than just a presentation tool; it’s a versatile platform that can transform your classroom into a dynamic and interactive learning environment. Whether you’re delivering lessons, collaborating on projects, or engaging students with creative assignments, Google Slides offers endless possibilities to enhance your teaching methods.

In this post, we are going to go beyond the basics and share some different features that perhaps you may not realize exist within Slides. You can also listen to our podcast conversation linked below.
Let’s get started!
Customize The Dimensions of Google Slides
One of our favourite features of Google Slides, and one we often find ourselves sharing with staff, is changing the dimensions of your slides. You aren’t stuck with the default size for your slides. You can customize this, and make it your own!
The unit options are: centimetres (cm), inches, points, or pixels – it really just depends on what you want. Centimetres and inches are fairly self explanatory, but it’s great to be able to make an 8.5×11 inch page or any size that you’d like.
Here are the steps to changing the slide dimensions:

Want to make images or bitmoji stickers for student feedback? Use pixels when setting up your slides! Set the background as transparent (scroll down to learn how to do that!), and download the slide/image as a png when you’re done.
One of our new favourite keyboard shortcuts? Screen capture part of the screen, and have it save the image right to your clipboard instead of saving as a file on your computer. Mac user? Command + control + shift + 4.
Create Editable Worksheets or Activities By Setting An Image As A Background
In slides, you can set an image as the background of a slide. This feature is especially helpful if you want to create an editable worksheet or activity for your students.
Before you can add the worksheet to your slide, though, you need to have a png or jpeg image of the document. You can use the snipping tool (Windows) or do a screen grab (command + shift + 3 for whole screen, or command + shift + 4 to select the part of the screen on a Mac). If it’s a PDF, I will typically screen grab it from the print preview tab.
Once the image is saved on your computer, or uploaded on your Drive, you are ready to add it to the Background of your slide!

Once it is set as your background, you can add text boxes where you want students to input an answer. You will want to test for font size and type to make sure that the answer will fit in the text box.
You should also type in a ‘?’ or a word so that students can see where they should input the answer. I like to then select all of the text boxes (shift + click on each text box) and group them (right click, group) so that it’s harder for students to shift or accidentally delete a text box.
Change The Master In Slides To Create Custom Templates
This feature of Google Slides is a little more advanced, but you can actually change the master instead of changing the background and adding text boxes. In this method, you can create the layout with whatever background or features you want that can’t be changed/edited by students.

An image doesn’t have to be added to the background with this option, and in place of text boxes, you can insert placeholders (dropdown by textbox). It will then prompt students to put info in the text box – and you can preselect the font and font size for them.
And for all those font snobs like Rachel (????), you can change all of the fonts/layouts in the slide deck, and it will apply it to every single slide.
If you like what you have created and want to save it for a future slide deck, you can also create your own theme. All you need to do is edit a master, and then save it as a theme!
Use The Paint Roller For Quick Formatting In Google Slides
Another feature that is a quick and easy solution to continue your favourite font or formatting throughout a slide deck is the paint roller. Highlight what you want copied, click on paint roller, then go to the text boxes where you want that font and click on them. It will apply the exact same formatting. Be sure to click off the paint roller when you are done, though.

Insert Audio in Google Slides
This feature is fairly new to Slides, and took a while to get up and running. But now that it has arrived, it’s great to have this option!
This feature is particularly helpful for giving presentations and having some sort of audio (music, instructions read aloud, etc.) play while going through the slides in presentation mode.
Here are the format options for Google Slides Audio:

You can also listen to the audio while in editing mode, however you are not able to edit while listening at the same time. This creates a bit of a challenge during remote learning, but there is a solution.
Instead of using the insert audio feature within slides, you can insert an image of a speaker ????, and hyperlink the audio file to the image. Make sure you turn on link sharing for the audio file in your drive, though, or else it won’t work. The audio file will open in a new tab, and students can listen and edit at the same time.
Possible Uses For Audio In Google Slides
- Instruction slide
Record and insert audio of you reading the instructions. Students can read and listen at the same time – great for students that need the text read aloud! - Ebooks/Comics
Get students to create their own ebooks or comics. They can record themselves narrating their own books. - Student-created podcasts
Students can record their episodes and then insert audio onto crowd-sourced slides. They can add show notes/cover art and share with class, parents and/or community. - We’ve got a whole post dedicated to ideas for using audio in the classroom – check it out!
Be careful of file types! Not all devices will record in a file type that can easily be uploaded. Google Slides requires a wave or mp3 file. If your uploaded file won’t work, you may need to convert it – this can easily be done online.
An easy option is to avoid file types is to download audio only from Screencastify! Record your video. Once done, it will take you to the editing window. Click on the download dropdown, then click on download audio only! You can also download as an animated gif – we haven’t played around with this as of yet, but our interest is piqued.
If you haven’t tried Screencastify yet, we strongly recommend that you check out our post dedicated to amplifying learning with Screencastify! It really is amazing.
Reminder: Make sure you upload audio to a google drive folder, and that you turn on link sharing!
Choose Your Own Adventure With Google Slides
Who says that we have to follow a specific order in Slides? Do you remember those years of “choose your own adventure” books? Why not create the same with your Slides?!
This opens up many different possibilities. Students that need extra explanation can click to continue on to a more detailed lesson. Those students that don’t need more explanation can click to move on!
The biggest lesson here: you don’t have to go in order. Google Slides has a feature that allows you to link text or image on a slide to other slides in your slide deck.
To do this, you can use Rachel’s favourite shortcut: ctrl k (or command k for Mac users)! Once you ctrl k, a dialog box will open (similar to picture below), you click on “Slides in this presentation,” and then scroll down and choose the specific slide.
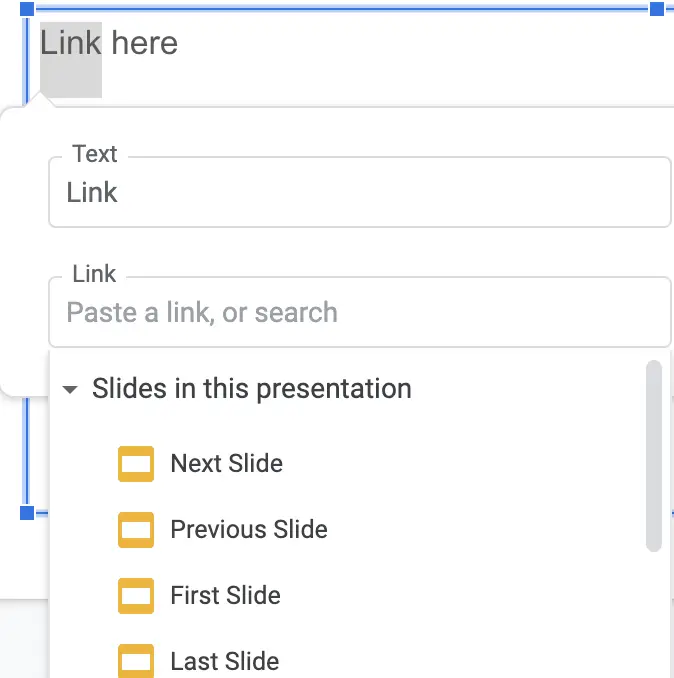
Uses Of Linking Between Slides
Table of Contents
You can set up a table of contents at the beginning of the slide deck. You can link each name or topic to the specific slide, and then people can navigate easily without having to scroll through the whole presentation.
As an extension, you could create a shared slide deck and have each student responsible for a specific slide. By setting up the table of contents, you can easily go to a specific person’s slide for viewing and marking purposes.
Digital Planners
This is a great way to encourage organization for students (or teachers!). You can set up a weekly or daily slide deck that links to the various activities that students need to complete.
Don’t have a digital planner template for slides? No need to worry! Slides Mania is an excellent source for templates. Check it out! Make sure you make a copy and save these templates in a folder on your drive so that you can use them again in the future.
Import Slides From Previous Slide Decks You’ve Created!
We especially love this feature in Google Slides. As teachers, we often create a lesson or PD presentation using Slides. After we’ve delivered the lesson we like to share it with students or staff, and have it in our drive, accessible to others.
Sometimes, you want to go back and use bits and pieces when preparing for a new presentation. There’s good news: You can actually import slides from other slide decks without having to copy/paste or destroy your other slide decks!

Once you click on Import Slides, it will open a dialog box which will show you all of the presentations in your drive. Select the slide deck that has the slides you want to reuse – then choose specific slides you want!
Share Your Presentation By Using Publish To Web Feature
This feature of Google Slides isn’t used too often. If you are using a Google Site, or you want to share a link to your presentation, publishing to the web will provide you with an embed link or url that you can use to distribute accordingly.

This dialog box will show up:
It defaults under the link settings. You can choose a different auto advance time, whether the slideshow starts as soon as it loads, and if you want the presentation to loop back to the beginning once complete. The embed section as the same options, with the addition of size options for your player.
If you click on “Published content & settings,” you will be given the option to require that viewers sign in to view the presentation (especially helpful if you are a GSuite Board or District).
To create a stop motion video/slide deck or to change the auto-advance time, you need to publish and then copy the url (or embed code). For reference, 3s = 3000ms – which is the default for auto advancing slides. If you have created a stop motion presentation, then 250ms is the ideal auto advance. From the url or embed code, you are going to delete where it says ms=3000 and replace it with 250 (or whatever time you prefer!)

Sharing Your Slide Deck In “Present” Mode
Alternatively, if you would prefer not to publish the presentation, but want to share your slide deck in such a way that it can only be in presentation mode, then copy your url, and delete from “edit” to the end, replacing it with “present.” It’s like forcing copies, but with a presentation.
More Tips And Ideas With Google Slides
Using Slides for Manipulatives or Other Activities
This is helpful for creating diagrams in science, for math class, and many other applications. You can create multiple of the same shape/image and stack them on top of each other. The students can drag and drop whatever they think that they need to answer a question or solve a problem!
Using Slides To Create Social Media Posts
Matt Miller has created a few different templates – TikTok, Instagram, Snapchat, etc. This allows you to bring the format and style that students enjoy and use regularly on those social media platforms, but make it into an educational activity. Social media without social media!
Hopefully some of these features in Google Slides will be helpful as you move forward with remote learning. Feel free to let us know of any features that you have really appreciated during this time – we’d love to hear from you!