This week, we are talking all about the Google Jamboard app, and how this tool can be used in the classroom, both virtually and in-person. We will go through the features available on the Jamboard frame, and how it differs based on the device you are using.
If you like what you hear, we would love it if you could share this episode with a colleague or friend. And make sure you subscribe so that you don’t miss out on any new content!
We would love to hear from you – leave a comment here, OR check out our FLIPGRID!
Show Notes
Google Jamboard is a great digital whiteboard app. This is an amazing tool that Google is always improving, and is perfect for collaboration and digital activities during remote, in-person and/or hybrid learning.
The easiest ways to access Jamboard is via the Google Apps waffle, or by going directly to jamboard.google.com. It would be much easier to be able to access and create a new jam in the same way we do docs, slides, etc. (app.new), so consider giving feedback to Google for jamboard.new!
Jamboard is essentially a more interactive version of Slides. The power of jamboard is getting students creating and collaborating. It has many features that are different based on the device that you are using: web-based computer/ Chromebook or an iPad/tablet.
Let’s get started by going over the features and tools within Jamboard!
Google Jamboard Features
One of the first features that you can find along the top of the frame (which is the what the board is called!) is the background. There are a variety of options, so choose what works best for you and your activity’s purpose.
Here are the options:
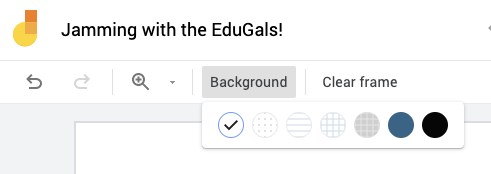
Once you have chosen your background, it is time to consider what you want to include on the frame, and to take a look at the tools available to you and your students to bring the frame to life.
Google Jamboard Tool Bar

This is where the tools will be different based on whether you are accessing it from a computer/chromebook, or an ipad, phone, etc.
We will start by sharing the features available on a computer/Chromebook, and then will include an additional section for iPad/Tablet tools.
Pen Tool:
Here you can find different free-hand writing effects. The pen options vary in thickness, and offer colour options as well. Of course, the colours are Google colours!
On an iPad? They also have assisted drawing tools (which are amazing!). You can write words, and it can transform it into typed text, or you can draw shapes or animals, etc. and it will interpret what you are drawing, and put it into a properly formed item.
Erase Tool:
If you click on it, it will transform your cursor into a circle which, once you hold down your cursor, will erase whatever it touches!
Sticky Notes:
These are fun! You can have them in various colours, and then you can type onto the sticky notes. They can be resized, which in turn resizes the text as well.
Add an Image:
With this tool, you can upload an image file from your computer, you can do a google image search, search your Google Drive, or search your Google Photos. The great thing about a Google image search is that it filters based on licence/copyright, so it does the legwork to ensure you aren’t violating copyright laws.
Shapes:
This is a fun option. There are lots of options! You can change the order, change border colours, etc. You can also fill with the same colours, but they are shaded a little lighter for an effect. You can also rotate the shapes as well.
Textboxes:
Textboxes are similar to sticky notes, but offer a more traditional use. You can change the style, which in turn changes the size, and you can change the colour and alignment of the text.
Laser pointer:
This is perfect for use during remote learning. This turns your cursor into a laser point that helps to focus your students’ attention as you are explaining or presenting parts of the frame.
Additional Google Jamboard Tools Available on iPads

Tablets and iPads have a whole bunch of additional tools available.
Drive content:
You can take anything from your Google Drive and pop it into your Jamboard frame. You can throw it on the frame, keep it small, and then click on the 3 dots and expand it. You can also double tap on the folder to expand it. This is one tool that we hope Google will consider adding to the computer/Chromebook set of tools.
Camera:
On an iPad, you can access the camera from your iPad and can take a picture that then adds it directly to your Jamboard. Think scavenger hunts or thinking classroom! Take photos of problem solving and add it to the frame.
Image Library:
Instead of taking a photo, you can access and add a photo from the photo library on your iPad.
Stickers:
This option is super fun! Some can even be used as templates by enlarging them!
Here are the sticker options:
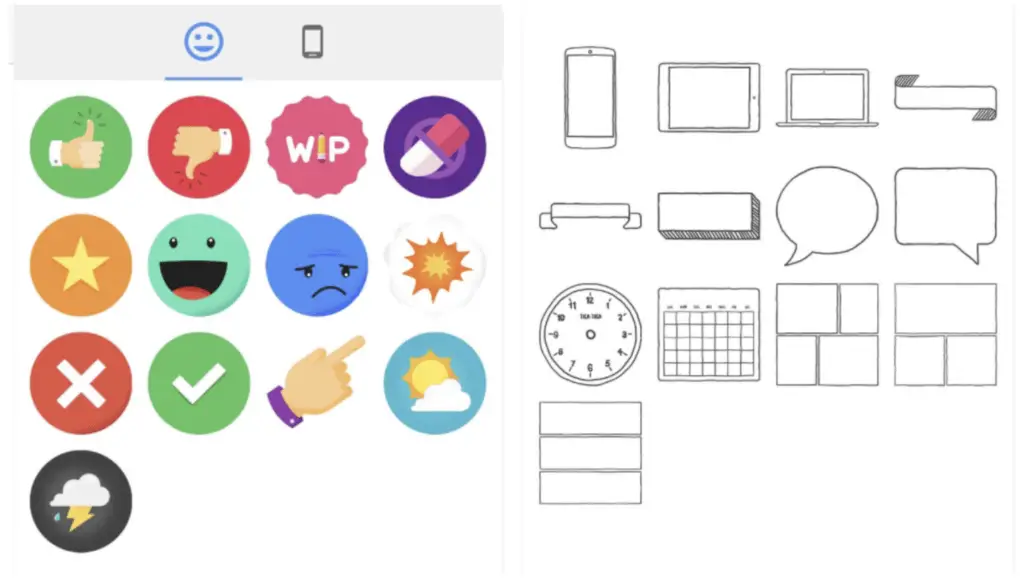
Some of these stickers can be used for templates, check in activities, and a variety of other digital learning activities.
Now that we know the features available, let’s talk about some practical tips on how we can use Jamboard in your classroom.
Practical Strategies, Tips & Templates for Google Jamboard
Our first tip, before getting into specific examples, is to consider making templates of a Jamboard that you want to use with your class. Once that is complete, make a copy, and use that copy with your class. This way, you have a template that hasn’t been used or changed, and can be ready for use with another group of students.
Also important to keep in mind, is that Jamboard offers collaborative opportunities for students, like much of the Google tools. While the verdict is still out on how many users can be on a Jamboard at a time, the maximum number of frames is twenty.
Jamboard can be a great way for students to share their learning, to collaborate, and to help each other.
Novel Study:
It can be used as a collaborative space where students can share their learning, show examples, and collaborate with their peers. Can be used to create spaces where students can show direct and indirect characterization, setting, theme, and more!
General Question Board:
This use is similar to padlet, but actually approved in our Board! You can create one for each unit or topic, and have them as general boards where students can place sticky notes with questions that they have. It is much less scary and intimidating than formal discussion boards on an LMS (like Brightspace or Google Classroom). This app tends to be more colourful and fun, which lends itself naturally to interaction.
To set this up you can create your backgrounds or template in slides, then download your slide as an image. Next, insert that image onto your frame. This way you can have a variety of text and images, etc. and they can’t delete pieces of it as easily.
Interactive Maps & Diagrams:
This app is great for labelling maps, diagrams, etc. in a digital format. Often we struggle as educators to find a way to digitally label or edit worksheets, and this could be a great solution!
Showing Their Work:
We often ask our students to show their work or to explain how they found their answers. Jamboard is a way for students to create visuals that show their thinking and problem solving skills.
Other Possible Activities:
- Four corners activity
- Thumbs up/Thumbs down
- Getting to know you activities
- Interactive discussions
- Smaller group work
- Brainstorming ideas
- Sketchnotes (particularly with an iPad)
Do you use EquatIO and Math Space? Go into your math space and create your equatio activities there. Then, copy/paste that onto your Jamboard to make it interactive! Create neat math manipulatives that get students collaborating and learning.
Google Jamboard Resources
- Jamboard Tools Reference and Glossary
- Jamboard Help Center and Community
- Jamboard Templates from Ditch That Textbook
- Jamboard Example and Resources from Rachel Coathup
- Jamboard Presentation from LaWanda Ca’stle
Have any ideas to share? Let us know! Leave a message on our FLIPGRID or leave a comment here on our website.
News & Updates
Citations in Google Docs
- MLA, APA, Chicago style
- Not from the explore tool!
- Now available within the Tools menu of the doc
- Check out the update here!
Shared Drives – Can NOW share individual folders!
- Can share one folder from a shared drive
- Person you share with can now add a shortcut to their individual drive, not just their shared drive!
- Check out the update here!