Welcome to our show notes for Episode 2 of our EduGals podcast. In this episode we are talking about how you can use Screencastify, a chrome extension that captures the screen and audio, for remote learning.
Please share this episode with others and subscribe to our podcast using your favourite podcast app so you don’t miss out on any of our new content.
Do you have any comments, questions, or suggestions for us?
We’d love it if you could leave us some feedback on our flipgrid or contact page!
Show Notes
Screencastify is an extension for Chrome (it lives beside your omnibox) and interacts with you within your Chrome browser. It can be used to create videos of your screen as well as your voice, and can also embed your webcam in the video as well.
How do you get started?
- Get the extension! Add it to your Chrome by clicking here.
- Once you’ve added it to Chrome, there are some set up steps that you’ll be prompted to complete
- Give permission for Screencastify to access mic and camera, and access to your Google Drive (for saving your videos).
- Click on the extension, and get started! Try out the different features, and explore all of the options.
- During the pandemic, Screencastify is offering a free upgrade to unlimited recording times, etc. Click HERE for the company’s COVID-19 response.
- Here is how you take advantage of this offer:
Step 1: Go to this website, and click “Redeem coupon” under next billing date.
Step 2: Entre code CAST_COVID
Step 3: Click “Activate License”
- Here is how you take advantage of this offer:
Practical Tips for use (student and/or teacher)
Keyboard shortcuts
These keyboard shortcuts are extremely helpful when recording videos – they allow you to pause when needed, and keep you feeling calm and confident throughout. No need to memorize every thing you want to say! For more keyboard shortcuts, you should check out this link!
You can also personalize your keyboard shortcuts – check out that link above for information on how to set up your own shortcuts.
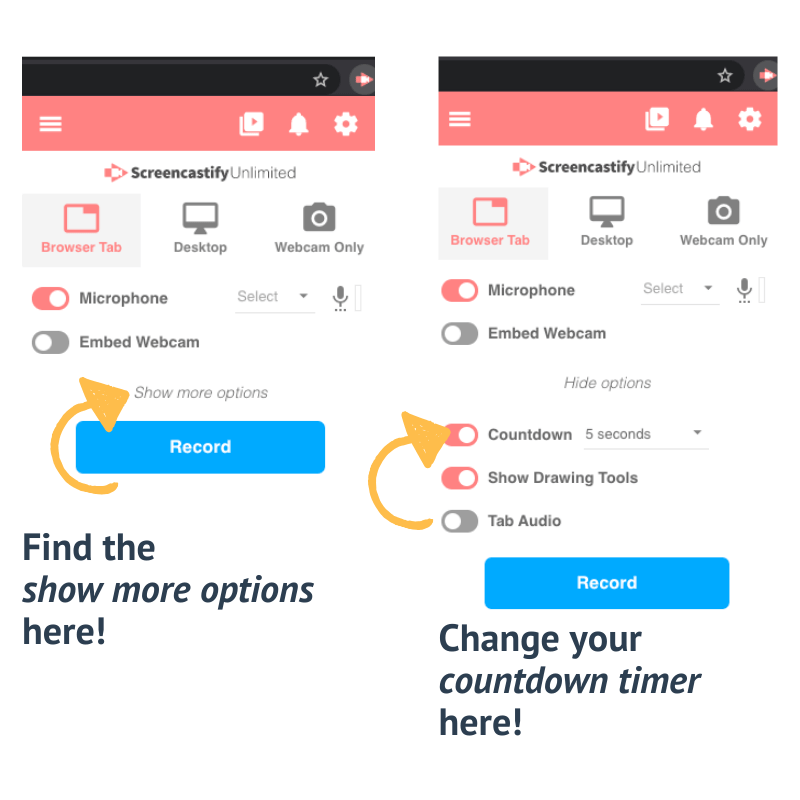
Countdown setting
The default for the countdown before recording begins is 3 seconds. Trust us, this is NOT enough time! You have the option of 5 seconds or 10 seconds for a countdown – it is far better to err on the side of caution and be calm and composed at the beginning of your recording.
Don’t underestimate the use of this setting.
Have a plan!
There’s nothing worse than starting a recording and having your mind go blank!
Write down some sort of plan or structure for what you want to say. It doesn’t have to be completely scripted, but make sure you include all of your important points.
The last thing you want to have to do is start all over again because you forgot to mention something!
Know what type of recording to choose
Tab, whole desktop, webcam?
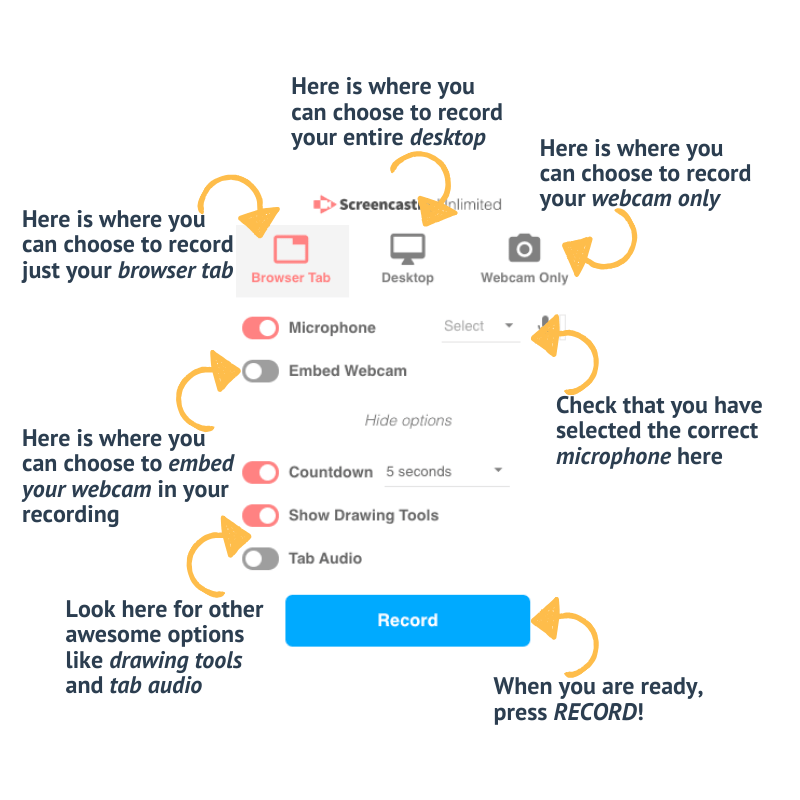
- The tab setting is used to record one single tab in a browser. For example, you may have Gmail open in one tab, and our EduGals site open in a second – all one window, but two different tabs or pages. The tab recording feature will only record the tab that you are currently in – viewers will not be able to see anything else on your screen.
- The whole desktop setting would be used if you want to record more than one tab, or something else that is on your screen. Be sure to close anything that has private information (student names, emails, etc.) so that you don’t accidentally record those!
- The webcam setting is used to record you! You have the option to embed your webcam into the screen, or you can just choose to record yourself.
- If you are recording yourself in your living room delivering a lesson on a whiteboard, then this is the setting you want! Just make sure that you clear the space of any personal items.
- If you are doing a slide deck, you may choose to embed your webcam so that your students can read your lips as you are speaking (especially important for English language learners, as they often rely on visual expressions, etc. to help them determine meaning).
Drawing tools for focus
Drawing tools can be enabled in the show more options section above the blue record button.
- These tools include:
- Pause – pause the recording; once you hit pause, you then have play (continue recording) or stop (ends the recording) as options.
- Mouse pointer options
- Focus mouse – dims the screen, but highlights the area around your cursor
- Hide cursor – hides the cursor when not moved
- Highlight clicks – a coloured circle appears around your cursor when you click
- Pen with different colour options
- Eraser (to erase any pen marks that you make)
- Embed webcam button in case you want to include the webcam for part of the video (can also turn it off)
Practical Teaching Tips
Virtual lessons incorporating a variety of apps
There are a variety of apps that you can use to make your Screencastify lessons more powerful. Examples of apps you can use are Jamboard and Awwapp. These are virtual whiteboards that you can create on your own to explain topics, or you can create and edit as a group.
These are just two examples. There are many apps, including Slides w/ closed captions, docs, etc. Just check privacy policies prior to inviting your students to use any apps, and ensure that they are approved by your District.
Virtual lessons can also be used for staff PD!
Explainer videos
Have students create these videos to answer a question or explain a concept. This is a great review tool. You can even create a shared class slide deck, and have each student create a video and add it to the slides. BOOM! You now have a resource that students can use whenever they want to review what has been taught in the class.
Lesson intro
Recording something to introduce a lesson will give students an overview of the remote learning work that they will be focusing on for that time period. Many students appreciate oral directions as well as hearing your voice (and seeing you if you turn on your webcam) and it can help to clarify instructions.
Feedback for assessment/evaluation
Instead of typing comments, create a screencast that addresses their work then include the sharing link to the video in the private comments section of Google classroom (or wherever you would share comments and feedback).
Record with Google Slides and turn on closed captions
This one is fairly self explanatory – increase accessibility for all of our students! This is particularly helpful for the English language learners in your class, as it gives them an opportunity to see the words on the screen as your are speaking. It may not be accurate 100% of the time, but it’s actually pretty good, and much better than relying on listening to it alone. Listening is one of the hardest strands when learning a language, so something as simple as clicking to turn on closed captions can go a long way for our students.
In place of presentations
Not all students have the confidence to stand in front of their peers and deliver a presentation, so why not help them build that confidence by replacing a traditional presentation with a screencast?! It is still quite easy to tell when someone is reading from a script, and it gives students an opportunity to share their learning while recording in a place where they feel safe, and aren’t affected by the nerves they may experience in real time. Students also tend to buy in a bit more with a pre-recorded presentation, and level up the effort they put into it.
Screencastify has lots of lesson ideas as well…
- Check these out:
Screencastify Submit
Students don’t have accounts, and you think it’s too complicated?
Try SCREENCASTIFY SUBMIT!
Screencastify currently has a Beta for Screencastify Submit – it is an app version where teachers can create an assignment, link it to their Google Classroom (or copy the URL and post to whatever platform you use), and students can create a Screencast without the need of an account!
The assignment then gets placed in a folder in your drive that was created by the app (folder is called ‘Screencastify Submit’). You can also choose to access it from your Screencastify Submit page (bookmark it for easy access!).
Interested? Click HERE to apply for early access to to the Beta!
Additional Resources
Here are some other resources that you may find helpful:
- Screencastify Teacher and Student Courses
- Master the Screencast
- Genius!
- Master the Screencast Jr. (for students!)
- Keyboard Shortcuts