In this episode, Katie and I are discussing the different ways that you can use Google tools to get organized and stay organized as a teacher, especially given how chaotic things have been recently. We focus on three main tools in G Suite: Google Drive, Google Calendar, and Gmail. We will give you a variety of tips and tricks with these tools to help you manage your time during remote learning.

Please share this episode with others, and consider subscribing to our podcast on your favourite podcast app so that you don’t miss out on any of our new content.
Also, please leave us your feedback and questions on our FLIPGRID!
Show Notes
I don’t know about you, but since the start of remote learning, I have had to seriously adjust the way that I organize myself and my time. I can no longer keep everything organized and separate like I could during face to face teaching, because now my only “classroom” or workspace is my dining room table (or home office in Rachel’s case). This is not ideal, especially in a profession like teaching. So this week we are focusing on how we, as educators, can restore a sense of calm and organization to our otherwise chaotic virtual spaces.
Google Drive
It’s easy for the files in your Google drive to get out of hand really quickly! From files shared with you to those you create yourself, it is a disaster in the making.
That being said, there are some pretty easy ways to get your Google Drive a bit more organized. You can make use of starred folders, colour coding folders, the priority tab and workspaces to really maximize the use of your Google Drive.
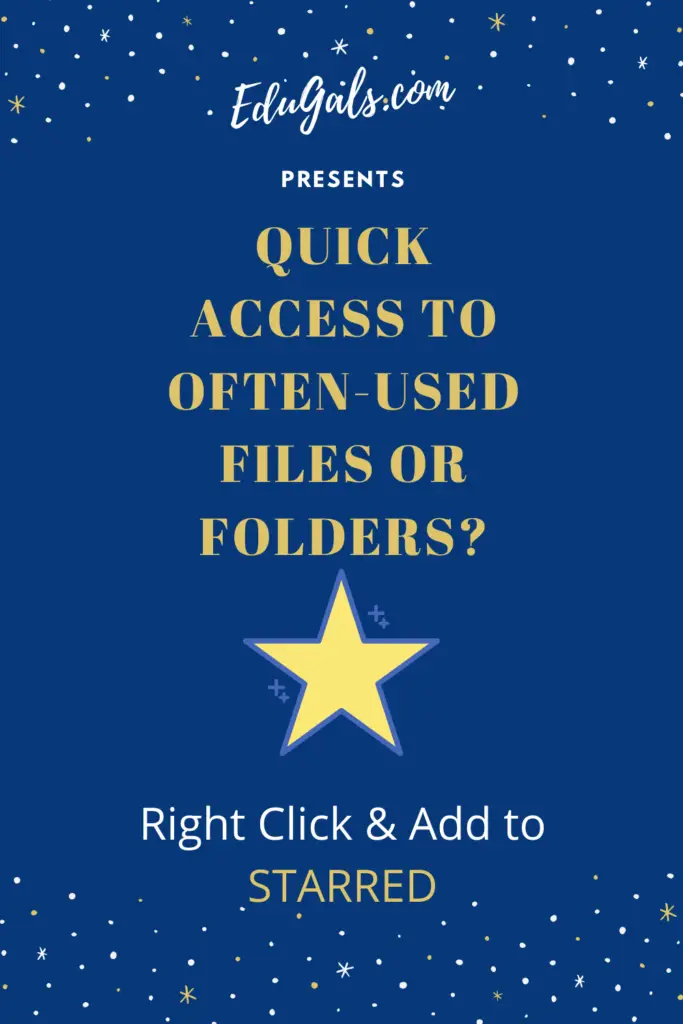
⭐️ Starred Folders
Starred folders are super handy when you have a folder in your Google Drive that you want to access frequently. By starring a folder, you can minimize the number of clicks needed to get to your folder, which can save you lots of time (and save your sanity too!). This is super useful especially when working with mobile devices.
To access your starred folders (or files), you will look to the left-hand side of your drive, where it lists the various drive locations. It will look different depending on if you work for a GSuite District/Board or not.
Below recent, you will see your “Starred” area of the drive.
Now, to add to this area of the Drive, right click on a folder or file, and click on “Add to Starred” – and voila! You are done! Now you can have all of your most frequently accessed folders or files easily accessible.
Now before you forget – go and add some folders (for example, your pandemic planning folders) to your Starred area.
Priority Tab
On the left hand side of your Drive, the same area where you find Starred, you will also find the Priority tab. If you click on that, it will take you to a space that has a couple of different features.
The first feature is a list of files that you access frequently. Google determines this based on machine learning. So the more you use this part of your drive, the more it will improve and learn what files you access.
The second feature is “Workspaces.” You can create different workspaces for your courses, groups you are involved in, etc. You can drop in files that you frequently need to access. You may also choose to add files that you are working on, but are not yet finished with, so that you can see what you have left to do, etc.
To create a workspace, click on “create” and give it a title! Then, add relevant files (up to 25 per workspace), click done, and you are good to go. You can also choose to add a file later, by right clicking on the file and adding it to the specific workspace.
???? Coloured Folders
Seems simple, but something as easy as changing the colour of your folders in the Drive can act as a really effective visual to help highlight important folders.
To change the colour, right click on the folder, “change colour,” now choose your colour!
This will help highlight current course folders or folders that you often use. They will now pop out, and will be easily found.
To add to that, you can also rename your current course folders, or folders that you access often. By adding “00”, “01”, etc to the beginning of a folder name, these will now be sorted at the top of your Drive, making it easier to see and to access.
Google Calendar
If you, like us, work in a GSuite Board or District, there are a LOT of calendars available when you open it up. It can be quite difficult if too many are checked off at one time! Before remote learning, this likely wouldn’t have been such an issue, but now that we have so many Meets and deadlines to try to keep organized, it has suddenly become very important to minimize the noise or number of events showing on your Google Calendars.
Only Show Relevant Calendars
On the left hand side you can see all of the calendars from Google Classroom (both current and old), and any other groups, etc. that you access during the school year. This could be your school calendar of events, calendars to book out rooms or technology, etc. And if your school is anything like ours, these calendars are BUSY! Make sure that you only have selected the calendars that you actually want to see right now.
You can also hide calendars that are no longer relevant. Click on the timbits (or the snowman) and click “hide from list.” They are still accessible, but no longer listed under your calendars, which helps to clean it up.
Change the colour of your calendars
By clicking on the 3 dots (or timbits) you can also change the colour associated with your different calendars. By having each of your courses assigned a different colour, you will then be able to see a coloured circle in front of the time/event that you have upcoming. This will help you to know which students you will be communicating with, or what type of meeting you have. It is another awesome visual cue to help you keep the information and events organized.
You can event create or link personal accounts, or calendars for various groups that you are involved in throughout the year. It will help you to see what is going on throughout the day.
Notifications in Google Calendar
Once you have your calendar set up with the appropriate groups, the next step is to make sure that you have notifications set up to ensure that you don’t miss an event or meeting.
To set up a reminder, click on the event, click on “edit” and the scroll down to the alarm bell symbol. You can click on the drop down where you will see “email” or “notification” as your two options. The email option will send you an email message to your gmail inbox at a specified time prior to the event. “Notification” will have an audio alert, as well as text along the bottom of your screen as a reminder that an event will be starting in a specified amount of time.
These are two great options to ensure that you do not miss a meeting!
Pin your Calendar Tab
If you haven’t yet, “pin” your calendar tab to your Chrome browser! Once you have your calendar open, right click on the browser tab, and click on “Pin.” And now, every time you open your browser, your calendar will be open. No more missed notifications!
Change your notifications settings
There are a few different options for notifications in your Google Calendar. To access these options, click on the settings cog wheel, click on “Settings” then scroll down to “Event settings.”
In this area you will be able to choose the default setting for how you will be notified for events via Google Calendar.
Your options:
Off – no reminders will be sent (not recommended)
Desktop notifications – shows up outside of web browser
Alert – within Google Calendar window itself
Personal Device Alarms
While it may not be necessary for some, we have also begun to use our own personal devices as an additional “alarm” or reminder about upcoming meetings.
At the beginning of the day, we will check our Calendar to see what we have for the day, and then set alarms a certain number of minutes before each event starts to help remind us that we need to switch gears and make sure we join a Meet or call at the appropriate time. It is particularly helpful for those times that you are busy and lose track of time.
Gmail
This one is by far the most difficult area of the GSuite to keep organized, and it has so many features that we often underuse to help stay organized. With the shift to remote learning, our inboxes have been filling up so much faster, so it has been difficult to stay organized and ensure that we respond in a timely manner to all of the messages that we receive.
Labels
You can set up labels in your gmail so that you can start to place emails into various different categories so that you can easily view and access based on what action is needed. For example, you can create a label called “Action Needed” so that when you click on the label, you can see what messages you need to respond to, and then relabel it once you are done.
Once you have created your first label(s), they can be seen in the left hand side of your inbox, below “Inbox,” “Starred,” “Snoozed,” etc.
To create them, you have different options. Here are what we see as the two easiest ways to create them:
Option 1: Scroll down on the left hand side (below inbox, etc.) until you reach “Create new label” – you may have to click on “More” in order to get here. Once you click on “Create new label,” a new window will pop open where you can type the name of your label, and then click on “create.”
Option 2: Click on an email that you want to label, and then click on the symbol, then “Create new.” Type in the name of your label, and you have now set it up!
If you want to add emails to a label, select them, then click on the symbol, and choose which label you want to use for those emails. That is it!
Keyboard Shortcuts in Gmail
Don’t forget: Keyboard shortcuts are wonderfully convenient! In Gmail you need to enable shortcuts before they work. To do this, follow these steps:
Step 1: Click on the settings cog wheel
Step 2: Click on settings
Step 3: Click on Advanced
Step 4: Enable custom keyboard shortcuts
Step 5: Save changes
Keyboard Shortcuts for Label: L → That’s it! Now just choose your label, and you are done!
Labels will definitely help you to better organize your gmail inbox, and to ensure that you follow up, as needed, and keep your unread messages as low as possible.
Archive emails
Once you have read an email and have responded or taken the appropriate action needed, label and then archive (keyboard shortcut: e) these emails. This will remove it from your inbox, but it won’t delete it. This will really help to clean up your inbox.
To find an archived email, you can click on the label, and find it there, OR you can search for it in the search bar at the top of your inbox.
Searching in Gmail
You can search by many different options: who it is from, who it was sent to, keywords to include and/or exclude, etc. There are many search functions to help you find emails that you have received or sent.
News and Updates
- Screencastify – Upload a screen recording directly to EdPuzzle; new app-smashing opportunities awaits!
- Teach from Home from Google – a hub with various synchronous and asynchronous online or remote learning
- Google Arts and Culture app-smash with Google’s Applied Digital Skills – no accounts or logins needed!